ADVISORY
(As of July 2017) Given the inquisition of LTFRB to the TNVS actions and regulations (both Uber & Grab), we highly suggest that if you want to sign up & be a partner, it’s BEST that we WAIT out LTFRB’s decision by September, 2017.
Right now, the LTFRB and TNCs are finalizing the regulations. We trust that the ridesharing industry will be better once there are final regulations and implemeting guidelines.
Let’s all support the LTFRB and TNCs in this endeavor.
—————————————————————————————————–
But of course there’s no one stopping you from learning all that you can about the TNVS business and the sign-up process. So, feel free to read and be informed in our blog. 🙂
First, we recommend that you go to one of their Info Sessions to know the details firsthand. We’ve posted about their Info Sessions and its schedule here.
Secondly, we want you to refer to TNVS FAQs to know more about the LTFRB regulation or you can also go to Uber’s TNVS Guide.
Thirdly, we recommend you read this article about what being LTFRB accredited and regulated means for partners & drivers to know more the business you’re interested to get into.
If you need a list of accepted cars for Uber Manila, refer here.
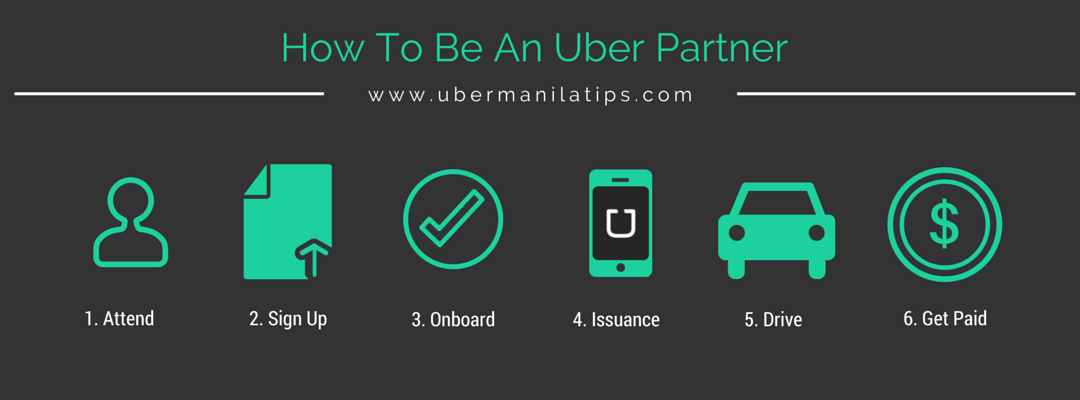
Here’s how you become an Uber Partner:
Step 1: Create Partner Profile
Go to https://partners.uber.com/drive/ and choose the city you want to drive in (i.e. “Manila, Metro Manila, Philippines”).
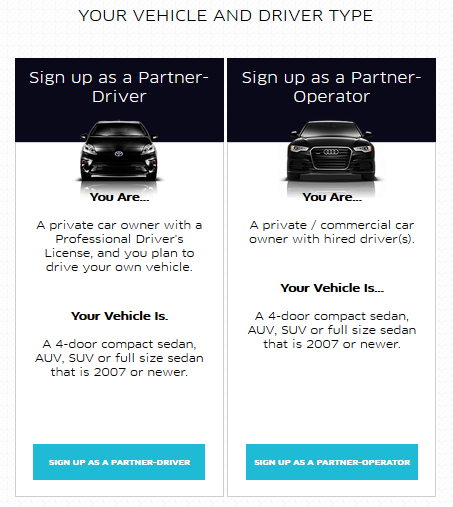
Select your Vehicle Type and Uber Partner Type:
- Vehicle Types: UberX or UberBlack. Check this post describing the difference.
- If you need a list of accepted cars for Uber Manila, refer here.
- Partner Account Types: If you will drive your own registered car, select Partner-Driver. If you are a car owner with hired driver/s, select Partner-Operator. Refer to this post to know the difference.
You’ll be taken to this page. Fill in the required fields.
Update, as per LTFRB Regulation, car must not be older than 3 years upon application. If you are applying 2016, car must not be older than 2013
You will be asked for a Business Name upon sign up. Now, you might be wondering if you need to have a business first before applying.
So here’s the deal… you know LTFRB is now regulating Uber (and Grab) and this means they will be releasing CPC franchise to business entities. DTI Business Name Registration is actually one of the requirements for LTFRB Accreditation. But, you don’t need yet to register your business before you sign up as a Partner.
We recommend that you sign up first as a Partner and get the required business permits once you’re activated. You might want to read the TNVS FAQ here, TNVS requirements here and what it means to be LTFRB accredited.
NOTE: You can add and enroll a vehicle even if it’s not under your name. Just make sure the name in the Proof of Registration and Proof of Insurance is the same.
Salin sa Filipino: Maaaring mag-enrol ng sasakyan sa Uber, nakapangalan man sa inyo o hindi. Kunsakaling hindi sa inyo nakapangalan ang sasakyan, siguraduhin lamang na ang pangalan sa Proof of registration at Proof of Insurance ay iisa (kung sa asawa nakapangalan ang sasakyan OK lang po. Basta dapat ang Proof of Insurance sa asawa din nakapangalan.)
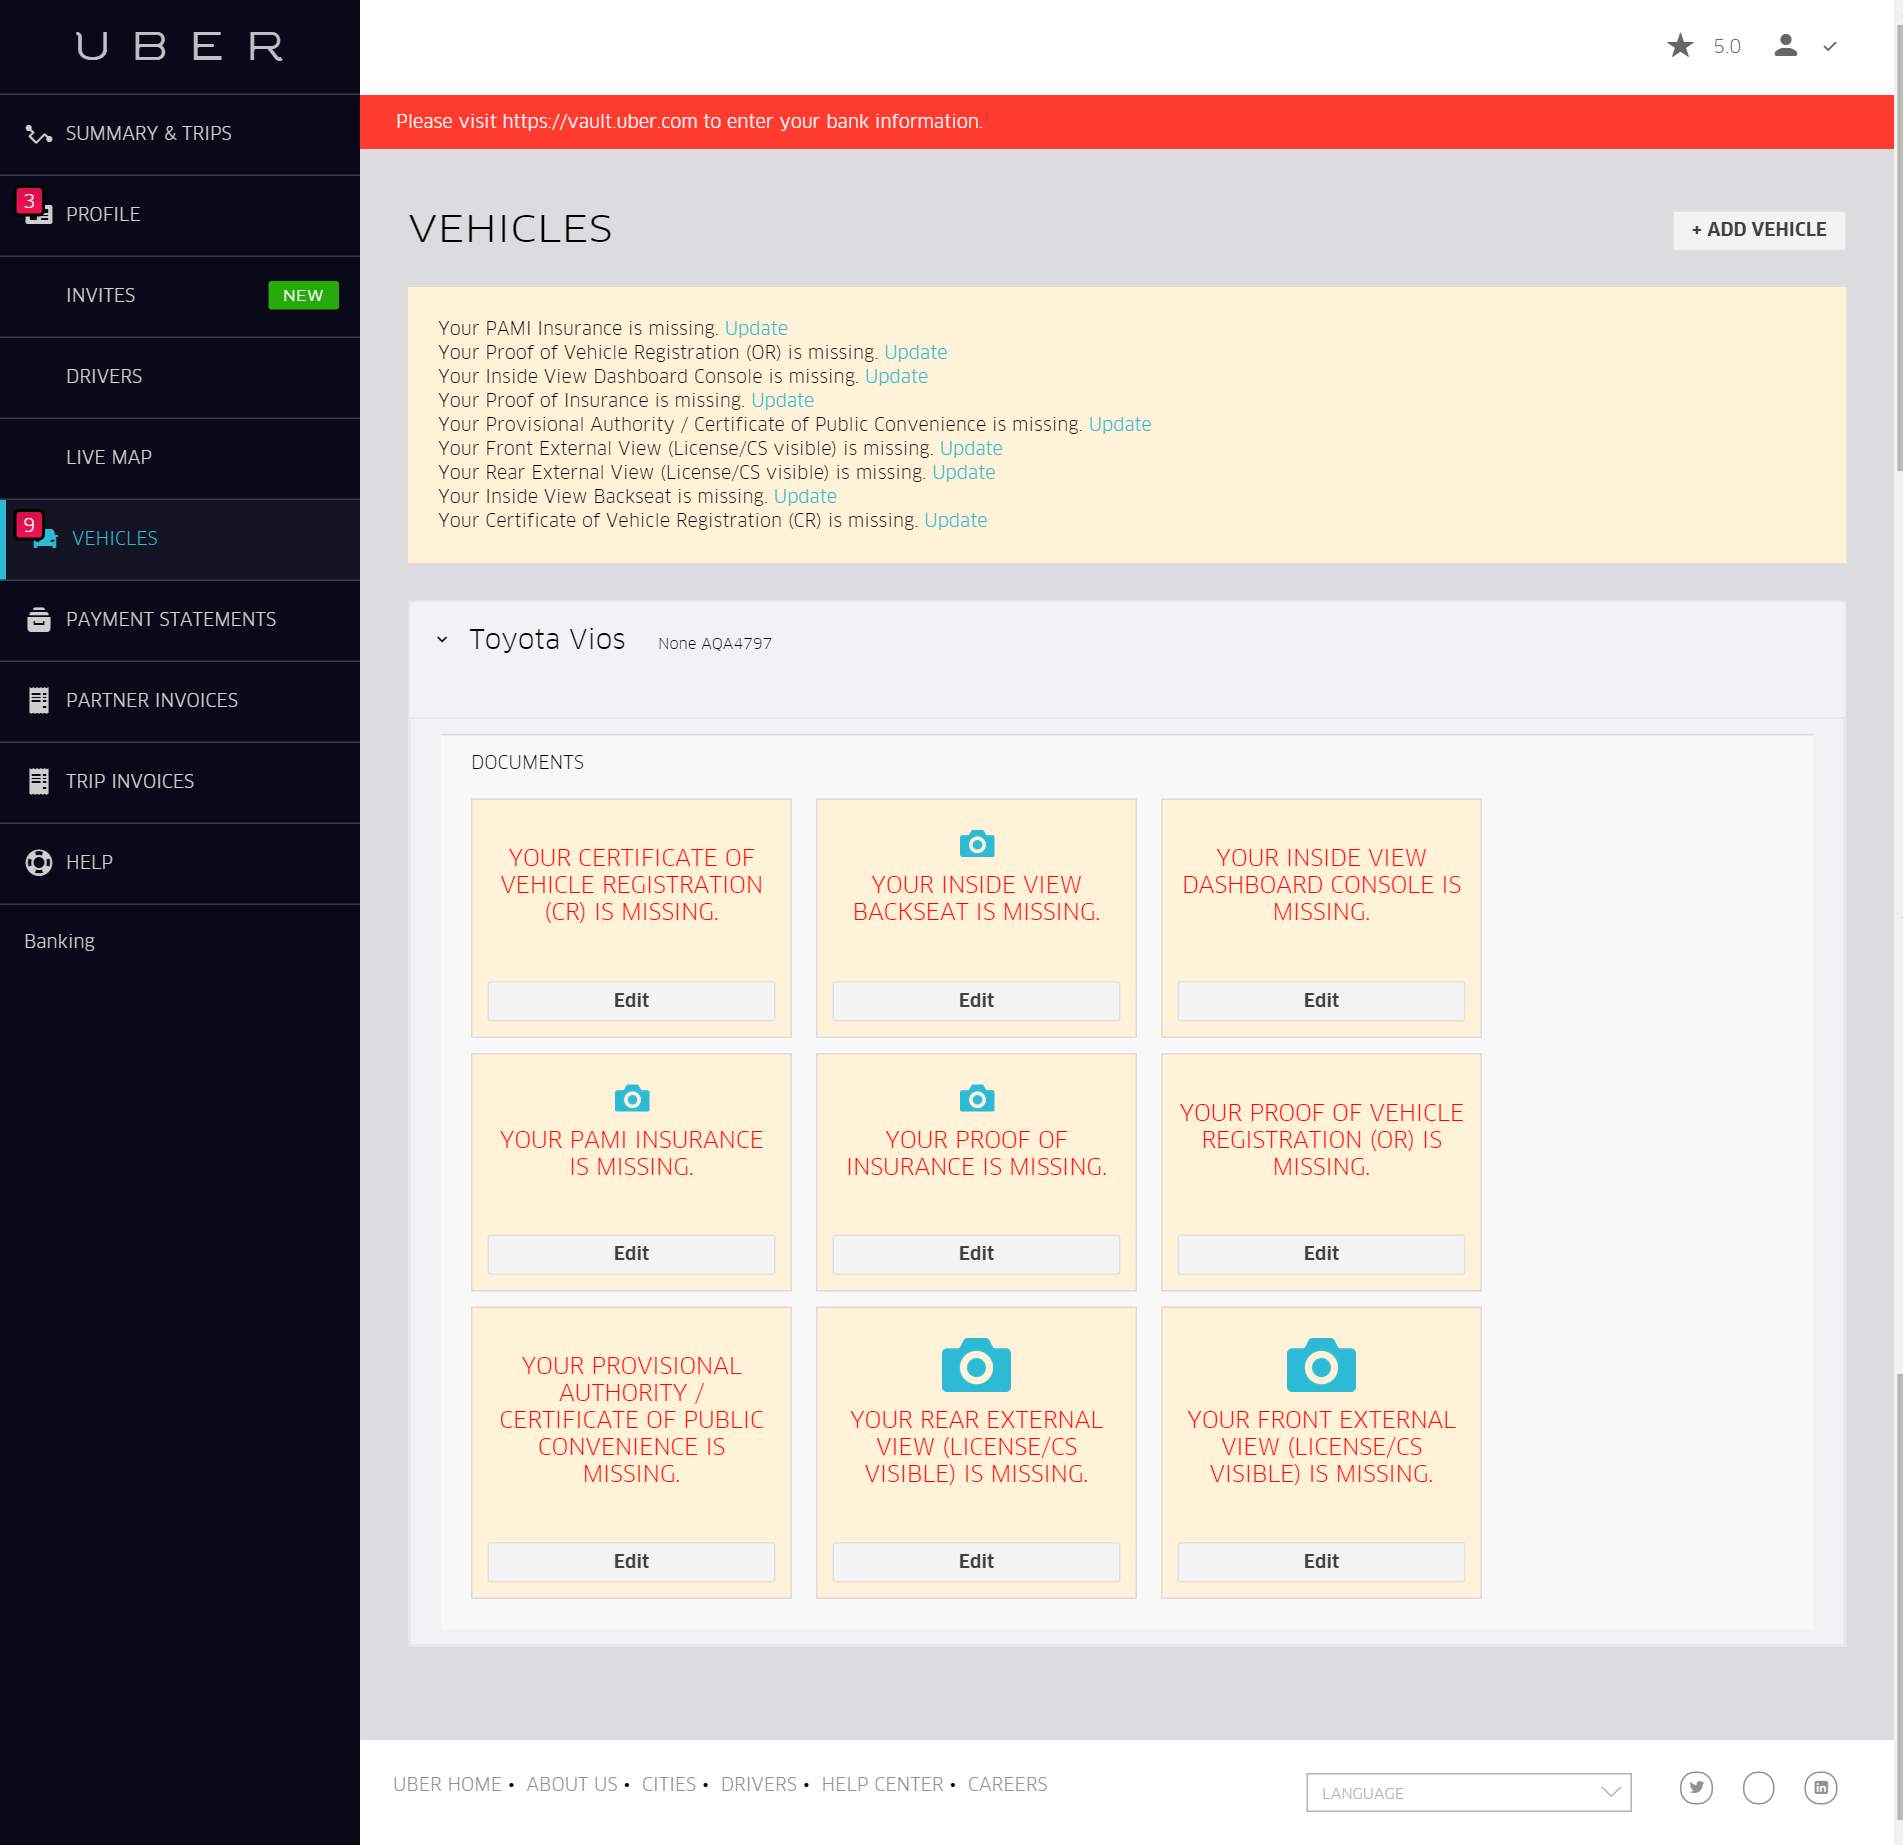
After sign up, go to https://partners.uber.com/login and you will see your Partner Dashboard:

NOTE: If you’re a Partner-Operator and DON’T plan to drive, you don’t need to upload anything here. But if you plan to drive, upload these requirements. You don’t need to add yourself as a Driver under your own account in the “Drivers Tab”.
Step 2: Register your Banking Details
Why do you need to register Banking details? Because this is where Uber will deposit the fares from your trips. So make sure that the details you provide here are correct. Otherwise, you won’t be able to receive your payouts on time (so much hassle!).
Uber releases payouts every week (click here to know the cutoff and schedule of payout). Also, the bank charges a certain fee for transfers, so expect that the deposited amount is less than the total fares. But don’t worry, we’ve found out the best bank to use for Uber Payouts.
In your dashboard, click on the “Banking” menu and you will be taken to another page (https://vault.uber.com)
Important Notes:
- Make sure the name you register is the exact name of the bank account you’re trying to enroll
- the Uber partner (account holder) and the name on the registered bank account does NOT need to be the same
- For Bank SWIFT/BIN Code, refer to this link.
**UPDATE: If you’d like to know the best bank and account type to enroll for Uber Banking, refer to this post.**
Step 3: Enroll a Driver
You’ll need the following details about your driver/s: Driver Name, Cellphone Number, Email Address, Username and Password (you’ll create these) .
Prepare these Requirements per Driver:
- Professional Driver’s License + OR
- NBI Clearance
- PNP Clearance (for LTFRB Compliance)
NOTES:
- You can add several drivers.
- If you want to drive as well, DON’t add yourself here. Upload your driver documents the Profile Tab. See the step above.
- Each Driver has to have a unique email address and password of their own. These will be used as their login credentials when they go online in the UberPartner/Driver App.
- The Number you indicate for each driver will be the number that the riders will contact. Make sure this number is the contact number of your driver so riders can call them.
- If you have an existing Partner account and want to add a driver, Refer here.

Step 4: Enroll a Vehicle
In the dashboard, you need to add a vehicle and indicate these details about your vehicle: model, make, year, color of interior and exterior. Then, upload the required documents as follows:
- Proof of Vehicle Registration: OR and CR. If the OR and CR are not yet released, you can upload your Sales Invoice first and update later on.
- Proof of Insurance: Comprehensive or TPL
- Four (4) Pictures of your vehicle: Front External View (License/CS visible), Rear External View (License/CS visible), Inside View Dashboard Console and Inside View Backseat
- PAMI Insurance: Uber will process this for you once you’ve submitted your TNVS requirements.
- Provisional Authority/ Certificate of Public Convenience: No need to upload anything here YET. You will get these after submitting your TNVS requirements to Uber. Learn more about the TNVS requirements here or Uber’s Official TNVS Guide.
Important Notes:
- Make sure the documents are valid and not expired, expiration date is correct and documents are clearly seen
- Model of the vehicle has to be not older than 3 years from year of application (if you applied 2016, car should be 2013 or newer)
- You can add multiple vehicles in your Uber Partner account, if you know the limit on the number of vehicles you can enroll, let us know in the comments below.
- The name on the Proof of Registration and Proof of Insurance has to be the SAME
- The name of the Uber Partner (account holder) and the name on the Proof of Registration and Insurance does NOT need to be the same
- Uber will deduct a Passenger Accident Insurance on your first pay out. This is Php 165 per passenger per year. This depends on the passenger capacity of your vehicle. Sample computation 5 seats (4 passenger + 1 driver) x Php 165 = Php 825 per year.
- If you have an account and want to add a vehicle,refer to this post to know how.
- You can add and enroll a vehicle even if it’s not under your name. Just make sure the name in the Proof of Registration and Proof of Insurance is the same.
Still Important Notes: If you are NOT the car owner of the vehicle you registered with Uber, you MUST read this article about getting TNVS and LTFRB Accreditation if vehicle is not under your name.
Salin sa Filipino: Maaaring mag-enrol ng sasakyan sa Uber, nakapangalan man sa inyo o hindi. Kunsakaling hindi sa inyo nakapangalan ang sasakyan, siguraduhin lamang na ang pangalan sa Proof of registration at Proof of Insurance ay iisa (kung sa asawa nakapangalan ang sasakyan OK lang po. Basta dapat ang Proof of Insurance sa asawa din nakapangalan.)
Step 5: Driver On-Boarding/ Orientation
Once you’ve completed the requirements, you can go to any of Uber’s office for Driver Orientation and Onboarding. Below are the schedules or you can refer to this ONBOARDING SCHEDULE. After this, Uber will do a background check and results will be released via e-mail after 7 business days.
TAGUIG: *WALK-IN*
- Address: 11/F SM Aura Tower, BGC
- Monday – Friday: 8am, 10am and 5pm (except non-working holidays)
- Saturday: 10am (except non-working holidays)
QUEZON CITY: *WALK-IN*
- Address: Regus, 5th Floor Gateway Tower, Gen. Roxas Avenue cor. Gen. Aguinaldo Avenue, Araneta Center, Cubao, Quezon City, Manila
- Monday – Friday: 11am to 6pm (except non-working holidays)
- Uber we will accept walk-ins for onboarding any time within these specified hours.
Important Notes:
- For faster transaction, UPLOAD all the driver document requirements first before going in for Onboarding.
- If you haven’t uploaded yet, remember to bring a valid Professional Driver’s License or government-issued photo ID.
- Regus’ office policies, shorts and slippers are not allowed.
- Please bring your Professional Drivers License to the onboarding – and also bring a second ID to leave at the reception.
- No need to bring the vehicle for physical inspection.
- You can go for Driver On-Boarding as soon as you’ve uploaded all the requirements above. No need to wait for the document status to be “Active”.
- Only those who will be driving are required to attend (example: if you sign up as a Partner-Operator but do NOT plan to drive – only your DRIVER needs to attend onboarding.
Step 6: Download the Uber Partner App

After you have submitted your documents, you can now download the Uber Partner App in your device. Uber does NOT provide devices anymore. As an Uber Partner, you will be responsible for to Bring Your Own Device (BYOD) and for your own mobile data.
TIPS:
- Only driver accounts or partner-drivers can sign-in in the Uber Partner App. If you are an operator but will not drive, you cannot login in the Uber Partner App. So, when you try to login, use the credentials of your driver. As an operator who will not drive, you can monitor the trips via the Partner Dashboard from web.
- If you want to know our recommended Mobile Data Plan for Uber based on our years of driving with Uber, read this.
- If you want to know the best smartphone to use as Uber device, refer to the link for recommended specifications.
Once you can login to the Uber Partner App, you can go online and start accepting requests immediately.
Step 7: Get LTFRB Accreditation

Once you are successful in your registration as a Parnter with Uber, you’ll need to get LTFRB Accreditation.
DON’T WORRY, IT’S EASY!
Uber is facilitating this via the Uber Compliance Program. Existing Partner-Operators, Partner-Drivers, and Drivers under a Partner need to submit requirements to Uber to start the accreditation.
**Click here for Uber’s Official TNVS Guide**
**Click here for UberMNLTips TNVS FAQs**
**Click here for the Requirements for TNVS and LTFRB Accreditation **
IMPORTANT: If you are NOT the car owner of the vehicle you registered with Uber, you MUST read this article about getting TNVS and LTFRB Accreditation if vehicle is not under your name.
Also, you might want to read our article “LTFRB Accreditation: What it really means for Uber Partners & GrabPeers” so you know the business you want to participate in.
Please let us know if there are details that need to be updated in this post, everyone will greatly appreciate your contribution!
If you still have questions, you can contact us or comment on this post. We’ll try our best to give you the most accurate information.
If you’ve found this article helpful, we would appreciate if you can use our Partner Invite Code “QPKMY” or sign up through this link: http://bit.ly/ubermnlsignup
Welcome Uber Partner!

Sign up as a Partner-Driver and start earning now!
If you have further concerns, you can drop us a quick question below and we’ll assist you in your Partner Registration.
[contact-form-7 id=”745″ title=”UBER Partner Assistance Quick Email”]

May I know the schedules of your info sessions?
Thanks
Hi! I am interested to enroll my vehicle to Uber. I have a Toyota Avanza 2008. May I know the next Info Session date? I cant find any contact number of Uber.
Hi Ninnia and Rey,
Upload first the documents for your car (Proof of Registration, Proof of Insurance, 4 pictures of the car) and the documents for your driver (NBI Clearance and Professional Driver’s License). Then you can proceed to the Driver On-Boarding everyday from 10am-1130am at 11F SM Aura Tower, BGC. You can refer to our step-by-step guide here: http://ubermanilatips.com/how-to-become-an-uber-driverpartner-in-manila/
If you wish to attend the Info Sessions, from what we know they are holding them every MWF at 12-1pm. Let us know how it goes!
Would also appreciate if you could use our invite code “QPKMY” when you register at https://partners.uber.com/
Thanks!
Hi Uber Partners and Drivers!
There’s an updated schedule for Info sessions. Take a look at this post here.
Hi, do you have an updated schedule of info session. Thanks
Hi Jay,
Partner Info Sessions are every Mon, Wed & Fri 12nn-1pm at 11F SM Aura Tower, BGC.
If you need a step-by-step guide on how to register as an Uber Partner, refer to this post: http://ubermanilatips.com/how-to-be-an-uber-driverpartner-in-manila/
Hi.
Pede po bang maging operator ang OFW? or need ng representative to act as operator ng uber?
Hi,
You can register in Uber Manila even if you’re an OFW. However, of course you need someone to look after operations of your car.
Hi
One of the blogger asked that in application she required with original OR but she cant provide because she is still paying it in the bank. Original is really required?
HI Rina,
Sales invoice or ORCR is good.
Kailangan ba po ba na may email address yung bayaw ko na namamay-ari ng unit ? Isa po kasi siyang seaman . Ano po mga requirements nya kung meron mang kailangan . pwede po ba ako nalang ang maglakad sa lahat ng requirements, may SPA naman po na pinagawa at iniwan niya sa akin.
Kindly refer to this link: TNVS if vehicle not under your name: http://ubermanilatips.com/how-to-get-tnvs-and-ltfrb-accredited-in-uber-if-vehicle-is-not-under-your-name/
Hi! Does it mean I cant use my Hyundai Accent since it has no passenger airbag? 🙁
A lot of Partners are using Hyundai Accent. Here’s a full list of the vehicle requirements and accepted cars for Uber Manila, you can also get a car quote in this link:
http://ubermanilatips.com/become-uber-partner-uber-driver/list-of-accepted-cars-for-uber-manila/
Hi admin. i want to be an uber partner. Nagrenew ako mg pro license kya lng wla pang available n id kya yemporary p lng ang license ko. Pero ibinigay s akin ni LTO ang lumang id habang wla ung aking bagong id. Pwede ko ba ipresent yun as proof na may prolicense ako together with my temporary license?
You can upload a copy of the Receipt with stamp as temporary license and a Govt ID (with BDAY)
Here’s a step by step guide on how to be an Uber Partner. Let me know if you still have questions.
http://ubermanilatips.com/how-to-be-an-uber-driverpartner-in-manila/
ask ko lang po my car is a toyota wigo pwede po ba?big thanks more power
Hi, here’s a full list of the vehicle requirements and accepted cars for Uber Manila, you can also get a car quote in this link:
http://ubermanilatips.com/become-uber-partner-uber-driver/list-of-accepted-cars-for-uber-manila/
how much is gonna pay for all to register and how much is the aps to download it..thx
Uber gets 20% transaction fee from your gross fare. TNVS Application costs about Php 4000 Kindly refer to UberMNLTips’ TNVS FAQ: http://ubermanilatips.com/tnvs-faq-by-ubermnltips/
Hi , i have a toyota avanza 2016 however i dont have a driver how do i go about it thank you
Hi Krizelle, here’s a guide on how you can find a driver: http://ubermanilatips.com/ubermatch-operators-looking-driver/
If you want to get all the details about being an Uber Partner, we highly recommend you watch the replay of the FREE webinar we did a couple weeks back. We guarantee all your questions will be answered plus pioneer and seasoned Uber Partners will give some practical tips at the Q&A portion at the end. You can access the replay here: https://app.webinarjam.net/replay/1010/be1796dcdb/0/0
Also, here’s a step by step guide on how to be an Uber Partner. Let me know if you still have questions.
http://ubermanilatips.com/how-to-be-an-uber-driverpartner-in-manila/
Hi ! Can i ask pwd na po bang maging uber driver ang isabg tulad kong 19 years old ? Base po kasi sa requirements nasinabi niyo such as pnp and nbi clearance at driver’s liscense i have it all already . Pwede na po ba ako maging driver tsaka pwd na rin po bang ipasada at iapply sa uber yung dinown lang pong vios 2016 ?
Kailangan po ay 21 years old yung driver na may Pro Drivers License.
Hello,
Kung hindi pa po NBI receipt and Driver’s license po ang available pa lang. Makakpag register na po as uber drivers? Salamat
Kailangan nyo pong macomplete lahat ng requirements para makaregister kayo.
In case you need, here’s a step by step guide on how to be an Uber Partner: http://ubermanilatips.com/how-to-be-an-uber-driverpartner-in-manila/
2010 model honda jazz pwede po ba ipasok in uber or grabcar?
To be a regular Uber Partner, as per LTFRB you need a 3 years old or newer car. If you want to register your car in Uber, you can register in UberCOMMUTE which is 2006 car model or newer is accepted. Here’s some guides on how to join in UberCOMMUTE: http://ubermanilatips.com/ubercommute-shareyourdrive-part-time-uber-partner/
Hello,
I live here in the US but i want to be an uber partner in Manila, my brother will drive my car. Is it ok even if i don’t attend the seminar? Do u have online seminar, webinar or recorded video? Thank u…
If you want to get all the details about being an Uber Partner, we highly recommend you watch the replay of the FREE webinar we did a couple weeks back. We guarantee all your questions will be answered plus pioneer and seasoned Uber Partners will give some practical tips at the Q&A portion at the end. You can access the replay here: https://app.webinarjam.net/replay/1010/be1796dcdb/0/0
Hi this is iya ask ko lang estimated price ng magagasyos to apply for uber and sa franchise sa ltfrb
There’s no fee to register with Uber. Uber only takes 25% service fee from your gross fares when you start driving. However, there is fees for LTFRB TNVS accreditation which costs around Php 5000. But Uber will process this on your behalf and charge you after submission which they deduct from your payout. So there’s no cash out to register and get activated in Uber.
Here’s a step by step guide on how to be an Uber Partner. Let me know if you still have questions.
http://ubermanilatips.com/how-to-be-an-uber-driverpartner-in-manila/
Hi where can I send/upload my requirements? Thanks
HI Jeffrey,
You can create an account and submit your requirements through this link:
https://get.uber.com/drive/?invite_code=qpkmy
hi po, pwede po ba ang toyoya wigo model 2014?
Here’s a full list of the cars accepted for Uber Manila:
http://ubermanilatips.com/become-uber-partner-uber-driver/list-of-accepted-cars-for-uber-manila/
hi po pwede na po ba akong mag seminar on boarding kahit police clearance at license ang meron ako kc po one week pa para makuha ko yng nbi ko?
Yes.
Hi.im planning to buy my friends car it’s under uber and I want to continued to drive it,is it transferable ? Tnks!
LTFRB requires that the TNVS Applicant is the Vehicle Owner. In this case, either your friend is the TNVS Applicant or you do Transfer of Ownership. Kindly refer to UberMNLTips’ TNVS FAQs:http://ubermanilatips.com/tnvs-faq-by-ubermnltips/
PWEDE PO BA ITXT UNG MGA DRIVER NG UBER?? INCASE OF EMERGENCY??
You can email them thru gawin nyong subject EMERGENCY or ACCIDENT. Or you can also report incidents throught the Uber Driver App.
Montero is acceptable?
Hi Allen, here’s a full list of the vehicle requirements and accepted cars for Uber Manila, you can also get a car quote in this link:
http://ubermanilatips.com/become-uber-partner-uber-driver/list-of-accepted-cars-for-uber-manila/
hi, gud day question po mayron po akong bagong nabeli but di poh sa akin na kapangalan kc poh na sa abroad ako and plano kong e member sya ng uber.paano un di poh naka pangalan sa akin pero ako may ari and ako na rin ang driver. ano poh ba ba recquirments ngayon kc balita ko stop daw uber.thanks
Kindly refer to this link about TNVS if vehicle not under your name: http://ubermanilatips.com/how-to-get-tnvs-and-ltfrb-accredited-in-uber-if-vehicle-is-not-under-your-name/
If you want to become a Uber Partner. Here’s a step by step guide on how to be an Uber Partner. Let me know if you still have questions.
http://ubermanilatips.com/how-to-be-an-uber-driverpartner-in-manila/
Hi any info regarding total cash out for registration of my car at Uber….
There’s no fee to register with Uber. Uber only takes 25% service fee from your gross fares when you start driving. However, there is fees for LTFRB TNVS accreditation which costs around Php 5000. But Uber will process this on your behalf and charge you after submission which they deduct from your payout. So there’s no cash out to register and get activated in Uber.
If you want to become a Uber Partner. Here’s a step by step guide on how to be an Uber Partner. Let me know if you still have questions.
http://ubermanilatips.com/how-to-be-an-uber-driverpartner-in-manila/
I’m interested to be an Uber operator and will buy a car in the next four weeks. Can you tell me the minimum requirements for Uber X, is it true that sub compacts will no longer be allowed? Is it risky to buy a car if there still a TRO for the TNVS
Hi Tiny,
There’s no official news from LTFRB nor Uber that compact cars is ot already accepted in Uber.
If you want to get all the details about being an Uber Partner, we highly recommend you watch the replay of the FREE webinar we did a couple weeks back. We guarantee all your questions will be answered plus pioneer and seasoned Uber Partners will give some practical tips at the Q&A portion at the end. You can access the replay here: https://app.webinarjam.net/replay/1010/be1796dcdb/0/0
Also, here’s a step by step guide on how to be an Uber Partner. Let me know if you still have questions.
http://ubermanilatips.com/how-to-be-an-uber-driverpartner-in-manila/
Hi there i have a problem in signing in of my account iam the operator but i cannot go on with dashboard like vault.uber.com to enroll my banking account. Because i need to sign in first. I did everything in resetting my password. Please help me my acvount was activate last jan 5 2017 until cannot sign in. Can you feedback me for what is the best thing to do or i may do make a new account?. Thanks for your concern.
You can try the “Forgot Password” option if you forgot your password for your account. If that doesn’t work, you can also go to Uber’s HQ in Greenfields, Mandaluyong to retrieve your account password.
Good day, my vehicle is a 2008 isuzu dmax pickup. Can it be registered as well? And to be an uber driver, can it be part time? I have a day job, im planning to just give rides before and after my work schedule. Thank you.
Hi Kris,
At the moment, pickups are not allowed in Uber.
If you need a step-by-step guide on how to register as an Uber Partner, refer to this post: http://ubermanilatips.com/how-to-be-an-uber-driverpartner-in-manila/
Hi, is it possible to use my hyundai Accent 2015 “HATCHBACK” as an UBER car?
Hi Ray,
Yes, this is accepted.
If you need a step-by-step guide on how to register as an Uber Partner, refer to this post: http://ubermanilatips.com/how-to-be-an-uber-driverpartner-in-manila/
Hi, are wigo, mirage, eon, piccanto allowed (hatchback cars)? they are included in your official list.
Yes.
do you have an official office?
sir, Additional. Is my suzuki Jimny acceptable.
I thought hatchback are not accepted?
“However, hatchbacks are NOT specified as an accepted vehicle type for TNVS vehicles.”
update?
About whether or not Uber is accepting hatchback vehicles, we believe, as of the moment, YES. If you go to Uber’s Activation Centers and Uber HQ, they will tell you that they accept; you will also see hatchback model on their website.
However, we are here to present you the facts about this issue so that you will be well informed as an Uber Partner. Best to refer to this article: http://ubermanilatips.com/facts-hatchback-vehicles-engine-displacement-requirement-tnvs/
Some facts:
1. Last January 2017 during the first TNVS Open Consultation, LTFRB gave a statement that hatchback vehicles are NOT allowed in TNVS category (Uber and Grab). Refer to this link: http://ubermanilatips.com/ltfrb-tnvs-first-open-consultation/
2. The LTFRB Chairman was recorded on video saying so. Watch the discussion here: (forward to 0:43 and 1:42:30 to 1:44:50) http://ubermanilatips.com/facts-hatchback-vehicles-engine-displacement-requirement-tnvs/
3. However, LTFRB also said that they will reconsider the TNVS guidelines.
4. Until now, there’s no final word yet from LTFRB about their decision.
Having said these, IT’S REALLY UP TO YOU if you will RISK to get a hatchback vehicle for Uber. If you want to be on the safe side, you can also choose another type of vehicle just in case LTFRB would not reconsider.
But rest assured that we’ll keep you updated about the verdict of LTFRB as soon as they make an official announcement. As of now, this is all we know. Hope this helps.
In case you need, here’s a step by step guide on how to be an Uber Partner: http://ubermanilatips.com/how-to-be-an-uber-driverpartner-in-manila/
it is possible of i register my 2015 toyota fortuner G as UberX? not Uberblack..thanks!
Hi Jayr,
Unfortunately I believe they automatically categorize Toyota Fortuner as BlackCar.
it is possible if i register my 2015 toyota fortuner G as UberX? not Uberblack..thanks!
Hi Jayr,
Unfortunately I believe they automatically categorize Toyota Fortuner as BlackCar.
thank you :<
do you accept toyota hi ace we plan on buying another one. we have 1 right now it is 2012 model
It’s really a nice and helpful piece of info. I am glad that you shared this helpful information with us. Please keep us up to date like this. Thanks for sharing.
Oh my goodness! an amazing article dude. Thanks Nevertheless I’m experiencing challenge with ur rss . Don’t know why Unable to subscribe to it. Is there anybody getting similar rss downside? Anyone who knows kindly respond. Thnkx
Appreciating the hard work you put into your blog and in depth information you provide. It’s nice to come across a blog every once in a while that isn’t the same out of date rehashed material. Great read! I’ve bookmarked your site and I’m including your RSS feeds to my Google account.
Is there a membership fee? Or joining fee? Any thing to pay how much? And what is the most rentable car.. My wife and i are planning to get a car to join uber..
Hi Robi,
There’s no memeberahip or joining fee. Uber gets 20% transaction fee from the gross fare. However, there might be charges relates to the device option. Refer here:
http://ubermanilatips.com/uber-manila-device-options-issuance-schedule/
Hello admin, pwd na po ba mag attend as uber partner at ako din po ang driver kahit na wala pang plate number at conduction sticker pa lng bagong release pa lng po kahapon ang brand new car at complete na po ang mga papeles para sa requirements ko at nakapag register na din po ako sa. online paraa di masayang ang panahon habang naghihitay ako ng proseso sa uber
If na-upload mo na ang mga requirements mo sa dashboard (except PAMI and PA), pwede ka nang mag Driver-Onboarding
hello admin i have a 2007 toyota innova E can i use it and register as a uber car?
HI nestor,
Yes. Here’s alit of the accepted cars for Uber Manila:
http://ubermanilatips.com/become-uber-partner-uber-driver/list-of-accepted-cars-for-uber-manila/
Here’s a step by step guide on how to be an Uber Partner. Hope this helps.
http://ubermanilatips.com/how-to-be-an-uber-driver-or-partner-in-manila/
we already sign up as a partner driver what will be the next step
what do you mean by uber x and uber black? thanks
pwede po bang mag apply sa uber kahit ang residence ay nasa province? thanks.
Yes but Uber operations is only in Metro manila
Hi Admin,
kung sa sta. rosa, laguna po ba mangagaling ang vehicle paano po ang charging sa passenger? kasama po ba pati toll fee?
Automatic po machacharge sa credit card nila ang toll fee na ireremit sa inyo kasama ng Payout. Driver po ang dapat magbayad ng cash sa toll.
follow up question lang po. ofw po ako, sa akin nakapangalan yung kotse pero ang brother ko ang magmamanage at meron syang driver. cno po ba ang kailangan magregister o mag-open ng account as partner-operator sa UBER, yung brother ko po ba o ako? ska meron din po bang ngppabook na rider from tagaytay or sta rosa, laguna area?
Kindly refer here: TNVS if vehicle not under your name: http://ubermanilatips.com/how-to-get-tnvs-and-ltfrb-accredited-in-uber-if-vehicle-is-not-under-your-name/
Uber operations is only in Metro Manila
Hi, pwede po ba ang automatic transmission n car s UBER? Thanks
Edwin
Yes pwede po: Here’s a full list of the vehicle requirements and accepted cars for Uber Manila, you can also get a car quote in this link:
http://ubermanilatips.com/become-uber-partner-uber-driver/list-of-accepted-cars-for-uber-manila/
I would like to ask if toyota avanza j 2009is accepted?and if only tpl insurance accepted..thanks for the future reply 🙂 godbless.. 🙂
HI Christian,
Avanza 2009 is accepted for UberX. TPL is accepted.
You can refer to this guide on how to be an Uber Manila Partner: http://ubermanilatips.com/how-to-be-an-uber-driverpartner-in-manila/
As per the info session schedule, you can refer here: http://ubermanilatips.com/uber-manila-info-session-schedule/
Let me know if you still have some questions. Would be glad to be of help.
P.S. If you found wwwubermanilatips.com helpful, we hope you can use our Partner Invite Code “QPKMY” when you register and get PHP 2000 Sign Up Bonus.
Best,
UBER MNL TIPS
Ask no Lang kng kailan maibibigay yung 2k per 1st 10 trips. Naka 88 trips na ung driver ko pero wala ako nakikita sa income n my na credit na. Sb sakin nung my tumawag fr Uber na makukuha ko dw yung 2k x 2 kasi dalawa yung car ko w UBER.
May tumawag po from Uber? Kaninong Referral Code po ang ginamit nyo?
You only get the Referral Code if you sign up as a Partner-Driver after you’ve completed 10 trips.Remember, your account (as a driver) has to complete these trips. If you’re a Partner-Operator, you can also apply as a driver yourself, just attend Driver Onboarding. It doesn’t count if the drivers under you completed them. 🙁
Hi admin, is toyota altis 2010 is still accepted? Thanks.
Car has to be 3 years old or newer.
Here’s a full list of the cars accepted for Uber Manila, you can also get a car quote in this link:
http://ubermanilatips.com/become-uber-partner-uber-driver/list-of-accepted-cars-for-uber-manila/
Hi admin, is toyota altis 2010 is still accepted? Thanks po.
Car has to be 3 years old or newer.
Here’s a full list of the cars accepted for Uber Manila, you can also get a car quote in this link:
http://ubermanilatips.com/become-uber-partner-uber-driver/list-of-accepted-cars-for-uber-manila/
hi admin i have a 2014 mazda2 hatchback can i use it and register as a uber car?
Hi Michael,
Yes, Mazda 2014 is accepted under UberX.
You can refer to this guide on how to be an Uber Manila Partner: http://ubermanilatips.com/how-to-be-an-uber-driverpartner-in-manila/
As per the info session schedule, you can refer here: http://ubermanilatips.com/uber-manila-info-session-schedule/
Let me know if you still have some questions. Would be glad to be of help.
P.S. If you found wwwubermanilatips.com helpful, we hope you can use our Partner Invite Code “QPKMY” when you register and get PHP 2000 Sign Up Bonus.
Best,
UBER MNL TIPS
Hi I just want to ask if it is possible to enroll my 2014 mazda2 hatchback as my uber car??
tumatanggap po ba kayo ng driver lang ? wala po akong kotse at gusto ko lang po sana mag apply as driver lang. thank you and regards
Hi Liza,
You can still set up an account and go to the Driver Onboarding even if you don’t have your own vehicle. Once you find an Uber Partner that has a vehicle, you can transfer under his or her account to start driving.
You can refer to this guide on how to be an Uber Manila Partner: http://ubermanilatips.com/how-to-be-an-uber-driverpartner-in-manila/
As per the info session schedule, you can refer here: http://ubermanilatips.com/uber-manila-info-session-schedule/
Let me know if you still have some questions. Would be glad to be of help.
P.S. If you found wwwubermanilatips.com helpful, we hope you can use our Partner Invite Code “QPKMY” when you register and get PHP 2000 Sign Up Bonus.
Best,
UBER MNL TIPS
Hi admin,
naisubmit ko na po ang OR,CR, at Professional ID LICENSE KO PWEDE NA PO BA AKONG MAG SEMINAR SA DRIVER ON BOARDING?AT WALA BANG DAPAT BAYARAN AGAD SA PAG PAPA MEMBER SA INYO?O PWEDENG DEDUCT NA LANG IF NAGSIMULA NA AKONG MAGDRIVE SA UBER(PAY OUT DEDUCTION)
THANKS,
CHARLES
Hi Charles, there’s no fee to register with Uber. Uber only takes 25% service fee from your gross fares when you start driving. However, there is fees for LTFRB TNVS accreditation which costs around Php 5000. But Uber will process this on your behalf and charge you after submission which they deduct from your payout. So there’s no cash out to register and get activated in Uber.
Hi liza im looking for a driver. Can i have your email address?
sir ask ko lang kung possible na enroll un hyudai accent 2014?.. binili ko sa friend ko assume balance si husband and mag dridrive. new professional drive lang siya.
Hi Molly,
Here’s a step-by-step guide on how to be an Uber Partner:
http://ubermanilatips.com/how-to-be-an-uber-driverpartner-in-manila/
P.S. If you found our blog helpful, hope you use our Partner Invite code “QPKMY” and get Php 2000 Driver Sign Up Bonus after completing 10 trips. Your husband (the driver) has to register the account and use the code to get the Php 2000 Driver Sign Up Bonus.
sure ..thanks
i am planning to get a new car and be an Uber partner. i wanna register the vehicle right away. would it be possible to register if i don’t have a plate yet? but i will be receiving or/cr after 7 days? is it okay to operate without a license plate yet? thanks!
Hi Gina,
Yes you can still register it with Uber. Once you get the plate number, just update the vehicle docs. As per operating without license plate, I believe this is OK; however, you have to consider the No License No Travel Policy of LTO.
Here’s a step by step guide on how to be an Uber Partner. Hope this helps.
http://ubermanilatips.com/how-to-be-an-uber-driver-or-partner-in-manila/
P.S. If you found our website helpful, hope you can like our page on Facebook to get more updates: https://www.facebook.com/ubermnltips/
Also, you can use our Partner Invite Code”QPKMY” when you sign up as a partner to get Php 2000 Sign Up Reward after you’ve completed 10 trips.
Best,
UBER MNL TIPS
http://ubermanilatips.com
do u have contact number? for inquiries..
Unfortunately, Uber doesn’t have a hotline number. If you want a personal guidance on the requirements for signing up, you can go to Uber’s Office in The Square, Greenfields, Mandaluyong. Also here’s the schedule of Partner Activation Centers: http://driveonuber.com/s chedules/
Question, my driver status is still pending onboardjng. My driver already completed with the onboarding session last saturday. What so i need to do? Thanks
Hi Rain,
Usually takes 5-7 days for the release of the background check. Ifyou still haven’t received feedback, you can email to follow up.
P.S. If you found our website helpful, hope you can like our page on Facebook to get more updates: https://www.facebook.com/ubermnltips/
Also, you can use our Partner Invite Code”QPKMY” when you sign up as a partner to get Php 2000 Sign Up Reward after you’ve completed 10 trips.
Best,
UBER MNL TIPS
http://ubermanilatips.com
hi admin,
ask ko lng po bat rejected status nung drivers license at or na inupload ko at pano ko po iupload ung 6 pages na content nung insurance policy ko.
awaiting your reply.
thanks
liezl
Hi liezl,
Try uploading a pdf file instead for the insurance policy. For the Drivers License, double check the expiration dates.
Here’s a step by step guide on how to be an Uber Partner. Hope this helps.
http://ubermanilatips.com/how-to-be-an-uber-driver-or-partner-in-manila/
P.S. If you found our website helpful, hope you can like our page on Facebook to get more updates: https://www.facebook.com/ubermnltips/
Also, you can use our Partner Invite Code”QPKMY” when you sign up as a partner to get Php 2000 Sign Up Reward after you’ve completed 10 trips.
Best,
UBER MNL TIPS
http://ubermanilatips.com
Hi, our vehicle is already active but still my driver license is rejected. Am the vehicle owner and i have my own driver who already attended onboarding at Jollibee Regalado last June 9. Both of us attended the said onboarding session. My driver details was also uploaded at my UBER account and status is still applied.
Ask ko lng po when can we authorized to pick up the device.
Thanks,
Liezl
HI Liezl,
Make sure you have an active vehicle and driver under your account before you can pick up the device.
Here’s a guide about device options and issuance schedules:
http://ubermanilatips.com/uber-manila-device-options-issuance-schedule/
P.S. If you found our website helpful, hope you can like our page on Facebook to get more updates: https://www.facebook.com/ubermnltips/
Also, you can use our Partner Invite Code”QPKMY” when you sign up as a partner to get Php 2000 Sign Up Reward after you’ve completed 10 trips.
Best,
UBER MNL TIPS
http://ubermanilatips.com
Hi Liezl,
Sincw you are the vehicle owner and you have a driver to drive. What account did you register? Partner operator or partner driver. Mejo naguluhan na ko kng pano. Pahelp sana.
Ang difference po ng Partner-Operator at Partner-Driver ay sa mga restrictions ng account. Dito po makikita ang difference:
http://ubermanilatips.com/uber-manila-account-change-from-partner-driver-to-partner-operator/
Is there any upcoming session in Jollibee regalado soon? Thank you.
Hi admin, I got a brand new honda brio amaze I would like to know if you accept this?
Thank you very much.
Hi Ramon,
Yes. Vehicle models from 2007 and up are accepted.
Here’s the difference between UberX and Black Car: http://ubermanilatips.com/basics-guide-to-uber-pricing-in-manila/
Here’s a step by step guide on how to be an Uber Partner. Hope this helps.
http://ubermanilatips.com/how-to-be-an-uber-driver-or-partner-in-manila/
P.S. If you found our website helpful, hope you can like our page on Facebook to get more updates: https://www.facebook.com/ubermnltips/
Also, you can use our Partner Invite Code”QPKMY” when you sign up as a partner to get Php 2000 Sign Up Reward after you’ve completed 10 trips.
Best,
UBER MNL TIPS
http://ubermanilatips.com
just want to ask if we can enroll a suzuki swift 2015 model
Hi Lloyd,
Yes. Vehicle models from 2007 and up are accepted.
Here’s the difference between UberX and Black Car: http://ubermanilatips.com/basics-guide-to-uber-pricing-in-manila/
Here’s a step by step guide on how to be an Uber Partner. Hope this helps.
http://ubermanilatips.com/how-to-be-an-uber-driver-or-partner-in-manila/
P.S. If you found our website helpful, hope you can like our page on Facebook to get more updates: https://www.facebook.com/ubermnltips/
Also, you can use our Partner Invite Code”QPKMY” when you sign up as a partner to get Php 2000 Sign Up Reward after you’ve completed 10 trips.
Best,
UBER MNL TIPS
http://ubermanilatips.com
Hi po. Follow up question lang po if you accept honda brio amaze for Uber?
Thank you very much.
Hi Ramon,
Yes. Vehicle models from 2007 and up are accepted.
Here’s the difference between UberX and Black Car: http://ubermanilatips.com/basics-guide-to-uber-pricing-in-manila/
Here’s a step by step guide on how to be an Uber Partner. Hope this helps.
http://ubermanilatips.com/how-to-be-an-uber-driver-or-partner-in-manila/
P.S. If you found our website helpful, hope you can like our page on Facebook to get more updates: https://www.facebook.com/ubermnltips/
Also, you can use our Partner Invite Code”QPKMY” when you sign up as a partner to get Php 2000 Sign Up Reward after you’ve completed 10 trips.
Best,
UBER MNL TIPS
http://ubermanilatips.com
Hi po. Thank you very much for the info. I Already registered and just waiting for the plate of my unit.
Thank you again.
Hi! Would you accept Wigo for Uberx?
Hi Cez,
At the moment yes, compact cars are accepted. Though not sure when they implement compliance to LTFRB Regulations.
Hi, Where would a 2013 Hyundai Sta. Fe be classified? Thanks!
Hi Michael
Vehicle models from 2007 and up are accepted.
Here’s the difference between UberX and Black Car: http://ubermanilatips.com/basics-guide-to-uber-pricing-in-manila/
Here’s a step by step guide on how to be an Uber Partner. Hope this helps.
http://ubermanilatips.com/how-to-be-an-uber-driver-or-partner-in-manila/
P.S. If you found our website helpful, hope you can like our page on Facebook to get more updates: https://www.facebook.com/ubermnltips/
Also, you can use our Partner Invite Code”QPKMY” when you sign up as a partner to get Php 2000 Sign Up Reward after you’ve completed 10 trips.
Best,
UBER MNL TIPS
http://ubermanilatips.com
Hello Admin,
Meron po kaming bagong purchase na 2nd hand car. Toyota Avanza 2010 J (White). Gusto ko sana i – register ito sa Uber. Ang problem po ay hindi ko pa napapa change Owner under my name. im planning na isabay nalang sa registration sa August. I have the deed of sale together with OR and CR of the Car.
In addition po. kukuha po kami ng driver (My Uncle) and for the Insurance TPL lang po ang kukuning namin.
May i know sir kung qualified ba ang car namin for Uber?
Hoping for your response. Thank you very much and more power Uber.
Hi Rommel,
1. It’s ok even if the car is not yet under your name. But male sure that the name of the vehicle registration is the same with the name on the insurance policy at the moment of signing up.
2. I think Avanza is accepted for as long as its model 2007 and up
3. TPL is OK just make sure name on theolicy is the same as the name in the vehicle proof of registration.
Hope this helps.
Is toyota vios 2015 acceptable?
Hi Joseph,
Yes Vios 2015 is very much accepted under uberX.
Hi Joseph,
Vios 2015 is very much acceptable under uberX.
Can I register our Kia Picanto 2015 to Uber?
Tnx
Hi Chris,,
At the moment, yes it’s accepted under uberX. However, it’s still unclear whether this type of compact cars will be accepted under the LTFRB Ride Sharing Regulation.
http://ubermanilatips.com/ltfrb-regulation-requirements-for-uber-tvns-cpc/
Hi, what is the difference between UberX and UberBlack? Toyota VIOS is under what category? Thanks
Hi Kristel,
Vios is under UberX. The difference is in the pricing. Here’s a guide:
http://ubermanilatips.com/basics-guide-to-uber-pricing-in-manila/
Here’s a step by step guide on how to be an Uber Partner. Hope this helps.
http://ubermanilatips.com/how-to-be-an-uber-driver-or-partner-in-manila/
Hope this helps. Let us know if you still have questions.
P.S. If you found our website helpful, hope you can like our page on Facebook to get more updates: https://www.facebook.com/ubermnltips/
Also, you can use our Partner Invite Code”QPKMY” when you sign up as a partner to get Php 2000 Sign Up Reward after you’ve completed 10 trips.
Best,
UBER MNL TIPS
http://ubermanilatips.com
Hi, your website is really helpful! I bought a new car and I want to hire a driver to drive it for me. Is that possible? Should I sign up as partner-driver or partner-operator? I tried to sign up as partner-operator but Uber asked for my company info. Hope you can help me out! Thanks!
Hi DJ,
Thanks!
Yes you can. You really need a company info it can be DTI naman because of the LTFRB Regulation.
Here’s a step by step guide on how to be an Uber Partner. Hope this helps.
http://ubermanilatips.com/how-to-be-an-uber-driver-or-partner-in-manila/
Ito po munting research namin tungkol sa LTFRB Ridesharing Regulation, CPC requirements at downloadable forms. Sana po makatulong.
http://ubermanilatips.com/ltfrb-regulation-requirements-for-uber-tvns-cpc/
Hope this helps. Let us know if you still have questions.
P.S. If you found our website helpful, hope you can like our page on Facebook to get more updates: https://www.facebook.com/ubermnltips/
Also, you can use our Partner Invite Code”QPKMY” when you sign up as a partner to get Php 2000 Sign Up Reward after you’ve completed 10 trips.
Best,
UBER MNL TIPS
http://ubermanilatips.com
hi! my vehicle is active and now still waiting for driver to be active. can i still avail your invite code? ty
Hi Jeffrey,
Once you’ve signed up, you can’t apply a promo code anymore. Also, your account (as a partner-driver) has to complete these trips. Unfortunately, it doesn’t count if the drivers under you completed them. 🙁
Hope this helps. Let us know if you still have questions.
P.S. If you found our website helpful, hope you can like our page on Facebook to get more updates: https://www.facebook.com/ubermnltips/
Does the operator need to submit an NBI clearance as well?
Hi Jen,
No need. Just the driver.
Hi admin gud pm ask lng po, for the moment what is the best renting vehicles because I, plan to buy.
Hi Carmelo,
Here’s a full list of the cars accepted for Uber Manila:
http://ubermanilatips.com/become-uber-partner-uber-driver/list-of-accepted-cars-for-uber-manila/
We’re going to release a list of best cars for Uber Manila by next week. watch out for that! 🙂
hi, i have a 2014 toyota vios 1.5G AT.. bought it brand new under financing since december 2013 under the name of my father in law but its mine, i am the one who paid the down payment and its monthly payment.. my father in law is an OFW thats why it is under his name for faster transaction.. can i used this car for UBER? even though its under my father in law’s name? does my father in law have to be here for it to be accepted in UBER? because he just flew back abroad.. thanks in advance for the answer..
Hi Ralph,
Yes you can. Just make sure that the name in the vehicle registration is the same as the name in the Insurance Policy of the vehicle. You can still use it under your account if you sign up with Uber.
Hope this helps. Let us know if you still have questions.
P.S. If you found our website helpful, hope you can like our page on Facebook to get more updates: https://www.facebook.com/ubermnltips/
Also, you can use our Partner Invite Code”QPKMY” when you sign up as a partner to get Php 2000 Sign Up Reward after you’ve completed 10 trips.
Best,
UBER MNL TIPS
http://ubermanilatips.com
Sir husband ko po ang magdDrive pero sken po kc nkpngalan ung sskyan nmen. Ano.po b dapat ko ineroll, partner driver or partner operator?
Hi Susi,
Pwede po kayo gumawa ng account or ang asawa nyo. If sa asawa nyo po ipapanganlan ang Uber account, dapat po Partner-Driver sya kasi magddrive din sya. If gusto nyo naman po na kayo ang gagawa ng account sa Uber at hindi naman po kayo magddrive, Partner-Operator po ang account na gawin nyo.
Kahit po sa asawa nyo nakapangalan ang Uber Partner-Driver account at sa inyo naka pangalan ang sasakyan, OK lang po yun pwede po ienroll yun under sa account ng asawa nyo. Siguraduhin lang po na pareho ang pangalan sa vehicle registration at insurance policy.
Sana po nakatulong.
P.S. If you found our website helpful, hope you can like our page on Facebook to get more updates: https://www.facebook.com/ubermnltips/
Also, you can use our Partner Invite Code”QPKMY” when you sign up as a partner to get Php 2000 Sign Up Reward after you’ve completed 10 trips.
Best,
UBER MNL TIPS
http://ubermanilatips.com
Confirm ko lang po. So gagawa n lng po ung husband ko ng account under his name na partner driver. Khit po saken nakapangalan ung sasakyan. Tama po ba?
Yes pwede po yun.
Salamat po.
Nkagawa na po account husband ko perodi pa lumalabas ung dashboard. Matgal po ba talaga un?
Nkagawa rin po ako isa account under my name n partner operator. Pano ko po madeactivate ung account n un
Hi Susi,
Supposedly makikita nyo agad ang dashboard.
Para po madelete yung isang account, email nyo lang po si Uber at
Ang lumalabas po pag log in ko.. ung congratulations n message.
Sir,
Tanong kolang kung hanggang ano aros ang free notary.
Sir kapag Driver Onboarding lang po ata libre.
Hi admin,
Kung sa father in law ko po nakapangalan ang vios nmin na gagamitin at ako po ang driver ano pong account ang dapat kong gawin? Partner driver or partner operator? Wala po ung father in law ko dito w pinas nsa abroad.
Thanks po..
Hi,
Can i rgister the car of my sister crosswind xl model 2012? But, i am the one who managed. Because, my sister is in abroad. How can i approachd you regarding this?
Hi,
Yes this is possible. just make sure that the name of the vehicle and in the insurance policy is the same.
Hope this helps. Let us know if you still have questions.
P.S. If you found our website helpful, hope you can like our page on Facebook to get more updates: https://www.facebook.com/ubermnltips/
Also, you can use our Partner Invite Code”QPKMY” when you sign up as a partner to get Php 2000 Sign Up Reward after you’ve completed 10 trips.
Remember, your account (as a partner-driver) has to complete these trips. Unfortunately, promo does not apply for Partner-Operators. It doesn’t count if the drivers under you completed them. 🙁
Best,
UBER MNL TIPS
http://ubermanilatips.com
hi, i was trying to follow the sign up link, but i keep on landing at a site that’s Uber, but language isn’t English.
Uber gd eve po ask lang po kung gaano pa po ka tagal maghintay sa backround check 1week na po akong nag hihintay ng email nyo po..
Hi Alix,
You can email Uber to follow up at
Sir, active na po ung s vehicle ko. Then pag click ko ng driver sa menu, ung driver na inenroll ko, nkagay is Applied, pro pag open ko nman s knya, under nung Drivers license, nakalagay po Active. Does it mean po ba na active na ung driver ko?
Isa pa po, pag ng log in po ung driver ko s account nya, kailngan p b nya mg add vehicle pati update ng banking?
kung sino po dyan no driver im available po!
Pa email po sakin rteribe(at)gmail(dot)com
Hi, I just want to know the charges made by Uber on the devices, and other charges? I am doing a cost analysis before I will venture into being a partner. Thank you.
Hi Nell,
Refer to this Uber Device option guides:
http://ubermanilatips.com/uber-manila-device-options-issuance-schedule/
Hope this helps. Let us know if you still have questions.
P.S. If you found our website helpful, hope you can like our page on Facebook to get more updates: https://www.facebook.com/ubermnltips/
Also, you can use our Partner Invite Code”QPKMY” when you sign up as a partner to get Php 2000 Sign Up Reward after you’ve completed 10 trips.
Remember, your account (as a partner-driver) has to complete these trips. Unfortunately, promo does not apply for Partner-Operators. It doesn’t count if the drivers under you completed them. 🙁
Best,
UBER MNL TIPS
http://ubermanilatips.com
Hi Admin,
Gusto ko mag signup as Partner/Operatot I don’t have professional driver’s license pero yung driver na ihhire ko professional po yung license nya, okay lang po ba yun kung non-pro lang ako?
At isa pa po, Yung business name na ilalagay ko kaylangan po ba nakaregister sa LTO or DTI or pwede ako maglagay na kahit anong business name?
Thanks for the help.
Hi Mike,
As a Partner Operator, you don’t need to upload a license if you don’t plan to drive. Just make sure yung driver mo PRo license.
Kelangan po registered with DTI. Refer to this article about Uber compliance program for LTFRB ridesharing regulation.
http://ubermanilatips.com/ltfrb-regulation-requirements-for-uber-tvns-cpc/
Hope this helps. Let us know if you still have questions.
P.S. If you found our website helpful, hope you can like our page on Facebook to get more updates: https://www.facebook.com/ubermnltips/
Also, you can use our Partner Invite Code”QPKMY” when you sign up as a partner to get Php 2000 Sign Up Reward after you’ve completed 10 trips.
Remember, your account (as a partner-driver) has to complete these trips. Unfortunately, promo does not apply for Partner-Operators. It doesn’t count if the drivers under you completed them. 🙁
Best,
UBER MNL TIPS
http://ubermanilatips.com
Kahit po ba isang auto lang ireregister ko then ipapadrive ko lang sa isang pro-licensed driver kaylangan ko pa mag register sa DTI?
Thank you po.
Opo kelangan po. Refer to this guide about The Uber Compliance program for LtFRB Regulations:
http://ubermanilatips.com/ltfrb-regulation-requirements-for-uber-tvns-cpc/
Hi,
My husband is an active driver for Uber. He’s recently driven for another Uber Operator. How come I can’t add him as a driver under my account? Can you please help?
Thanks.
He needs to send an email to using the email registered to his account requesting for change of operator. Or faster if you could go to SM Aura for him to request personally.
1. How do I make changes to my Uber – Operator account? I wanted to change the account name and the business name I have in my existing account. It seems like the only fields that I can change are the email address and my phone number in the profile tab.
2. During the Info session I attended today, the facilitator said that we do not have to file for the Cert. of Public Convenience (TVNS accreditation) Can you confirm? If yes, when do we need to prepare for this? Are there fees to pay?
3. Can I change bank accounts where my money is going to be transferred even when I have started operating?
4. Does my driver have to have an NBI clearance? This is a requirement in the TVNS accreditation.
Hi,
How do we change the business name in my Uber account? Thank you.
You can email Uber for the concern at
Hi, i just want to know if a driver having a non-professional license can drive Uber? 🙂
Hi Dan,
No. Driver has to have Professional License.
good day,
balak ko pa lang kumuha ng vios oara ipasok sa Uber..ask ko lang kung pwede na agd syang i apply kahit wala palang plate fr LTO?
may mga taxi na ako..pwedeko ba gamitin ung business ko sa taxi ko?
Hi Ellaine,
Yes you can use that business entity. Yes you can apply/register even if you don’t have a plate number yet. Application usually takes 1-2 weeks to complete, you can just update your vehicle documents once you have the plate already. Just take note of the no plate no travel policy.
Hope this helps. Let us know if you still have questions.
P.S. If you found our website helpful, hope you can like our page on Facebook to get more updates: https://www.facebook.com/ubermnltips/
Also, you can use our Partner Invite Code”QPKMY” when you sign up as a partner to get Php 2000 Sign Up Reward after you’ve completed 10 trips.
Remember, your account (as a partner-driver) has to complete these trips. Unfortunately, promo does not apply for Partner-Operators. It doesn’t count if the drivers under you completed them. 🙁
Best,
UBER MNL TIPS
http://ubermanilatips.com
Hi,
I’m planning to buy a brandnew Innova for Uber use. Will just ask if I’m qualified to become an Uber operator before purchasing the unit. Will be hiring a driver. And also, can I talk to a representative?
Thank you
Hi Noel,
Here’s a full list of the cars accepted for Uber Manila:
http://ubermanilatips.com/become-uber-partner-uber-driver/list-of-accepted-cars-for-uber-manila/
You can go to one of Uber’s Partner Info Sessions:
http://ubermanilatips.com/uber-manila-info-session-schedule/
Hope this helps
Hi, ask ko lang po kasi kulang pa ako ng kaalaman regarding sa device. Ok lang po ba na wifi yung gamitin instead mobile data, wala bang problema? Kung mobile data naman gamitin di po ba mauubos yung allocated na plan para dun sa carrier? For uber purposes lang po ba yung gadget? Di po ba pwedeng mag browse or makarecib ng text o di po ba pwedeng gamiting pang col? At tsaka, isa pa po. Once na naka online ako e, nakaligtaan na pindutin yung rider request, ano po bang status nun? Di po ba pwedeng ma recall or matawagan yung rider once na wala na ere? Or mag antay nanaman uli ng rider? D kasi ako na brief regarding dito at gusto ko pong malaman lahat. They gave the device without knowing kung ano ang gagawin. Maigi po na magtanong para alam ko po yung gagawin to start my online earning. Salamat. Sana masagot nio po laht ng aking katanungan.
Thanks again,
Florante
san juan
Hi Florante, you can refer to these training videos:
If naka Bring your own device po kayo, pwede tumawag at mag text. If naka Rent-to-Own po kayo sa Uber, hindi po pwede. Nakalock po ang cellphone hanggang matapos nyo bayaran (8 weeks). Unlimited po yung internet ng mobile data hanggang matapos yung 8 weeks. After 8 weeks, babayaran nyo na po yung internet ng Php 250 per week.
Hi, I recently signed up as a partner-operator and added a vehicle pero wala pa akong driver. Is it possible to get approved ng wala pa driver or kelangan sabay? Iniisip ko kasi na ipa-approve muna yung account then saka na ko mag add ng driver. Meron kasi mga existing uber driver na na gusto mag apply. Hope you can help me. Thanks!
Hi John,
Yes it’s ok na to follow yung driver.
anu po ung pnp clearance
HI joel,
Police clearance po. Refer to this article po:
http://ubermanilatips.com/uber-manila-compliance-process-for-ltfrb-accreditation/
Wants to be a member of your transport group UBER Philippined, foremost what should I do to process my membership. I will represent my membership as Partner- Operator although I can manage to drive. Anyway I will amend my membership if everything will be push through. My car is Toyota Corolla Altis model 2012 is this still acceptable? Knowing that according to the list of vehicles the model mentioned was 2007 to the latest one. I want to join the partner – operator session pls provide me schedules and the venue if possible. Thanks in advance. God Bless Us.
hi just wanted to ask.. is it also possible that we have to pay our own taxes whenever we started this business? or is it deductibLe?
Hi Admin,
Ask ko lang po makakapagregister lang po ba ako sa Uber as partner-operator pag regitered na yung business sa DTI? Please advise. Thank in advance :).
Hi Ricca,
You can register and sign up with Uber first then register the for LTFRB Accreditation.
Refer to this guide:
http://ubermanilatips.com/uber-manila-compliance-process-for-ltfrb-accreditation/
Hi, my husband was rejected as driver. Ang sabe di nkapasa s background check kc possible me kpngalan n may criminal case. D nmn kc nanghingi ng nbi s knya. Ano po kya pde nmen gwin? Mron nmn n sha nbi clearance. And me kpngalan tlga n meron case.
Hi admin. Just want to ask lang regarding the quota and incentives. Automatic ba naaadd yun incentives sa weekly remittance kapag nameet aquota or meron pa kailangan gawin para malaman na nameet ang quota? Thank you
That shiuld be automatic. It will reflect on your weekly payout.
Hi, gano katagal ang processing? meron nakong car kaso sales invoice plang and meron na din ako driver, so pls help po for next step. Nag-create napo ako ng account sa uber thanks
Sales invoice should be fine. Just follow this guide and you’ll be driving in no time!
Hi, If in case we someone who is already an uber driver. As the new employer, do I let him attend the onboarding again, and go thru the 7day clearance required by uber?
No need. Just request for driver transfer. You can do this via email or go to SM Aura office, it will take less than 10mins.
Hi, pwede po bang maging uber driver (part-time) having a non-professional drivers license? Part-time lng po sana when i’m on my way to work and pag-pauwi.
Hoping for your reply. Thank you
Hi Trev, all drivers should have a PRO driver’s license. If you don’t plan to drive and just plan to register as an Uber Partner-Operator, you don’t need to upload any driver’s license at all. Just make sure that the drivers under you have PRO Driver’s license.
Hi, my husband was rejected as driver. Ang sabe di nkapasa s background check kc possible me kpngalan n may criminal case. D nmn kc nanghingi ng nbi s knya. Ano po kya pde nmen gwin? Mron nmn n sha nbi clearance. And me kpngalan tlga n meron case.
Reply
Will appreciate your responsr po..
If I buy a brand new car do I have to wait for the plate in order to proceed?
Thanks!
Hi,
No. You can use the sales invoice when you sign up. Once the plate number is released, you can just update the vehicle profile.
Hi Admin,
I uploaded my vehicle’s documents and photos. Status now is still pending. I already have a driver who’s a former Uber driver and already have an Uber profile.
Can I already go to Uber office and request for account transfer of my driver even if my vehicle’s status is still pending? Please advise. Thanks.
Regards,
Dennis
Hi Dennis,
Re your pending vehicle activation, just email Uber at
Re driver transfer, yes it’s faster if you directly go to SM Aura. It will just take about 10 mins for them to do that.
Hi Admin, Needing your Help,
I Signed as Partner-Driver, currenlty i’m the one nag-mamaneho ng sasakyan, but soon I will hire a driver as my partner, pwede po ba two drivers registered in 1 vehicle?
Hi Joseph,
Yes you can. Just request for an Account Change to Partner Operator.
Here’s how:
http://ubermanilatips.com/uber-manila-account-change-from-partner-driver-to-partner-operator/
Hi there! Can the uber registered vehicle still be used as a personal vehicle? Or do we need to get another vehicle for personal use? Hope to hear from you. Thanks!
Hi Lea,
You or your driver can always go offline of the Uber system anytime if you need it for personal use.
hi admin ask ko lang po.. i apply as an uber partner and I add my vehicle and driver.. but my vehicle’s insurance will expire on sept.. and will automatically renew within the date of expiration… yet when I was uploading the documents including insurance.. they said that my insurance will expire within 41 days.. pano po un eh automatic renew po ung sakn? may date of expiration kase n nkalagay.. pero ung papers nun for renewal ifoforward nila once na narenew na ung car.. pano po un?
hi admin ask ko lang po.. i apply as an uber partner and I add my vehicle and driver.. but my vehicle’s insurance will expire on sept.. and will automatically renew within the date of expiration… yet when I was uploading the documents including insurance.. they said that my insurance will expire within 41 days.. pano po un eh automatic renew po ung sakn? may date of expiration kase n nkalagay.. pero ung papers nun for renewal ifoforward nila once na narenew na ung car.. pano po un?
Hi Jhun,
You can email Uber at or upload a different Proof of Insurance
Can I attend on a drivers on boarding without an NBI Clearance because my the release of my NBI Cert will be on July 29th..Am I allowed to attend considering that I uploaded all neccessary documents in my Uber Account?
Hi, drivers are still in the process of onboarding but I already have
an active vehicle. To avoid delays, I would already like to apply/
get a device from UBER. May I ask for the specifications needed for
the device, if I choose to get my own.
follow up on my question…………..if i do bring my own device to uber, how long does it take uber to activate the unit to make it “uber driver ready” ? thanks!
Nag register na po ako as partner/operator at naka attend na rin po ng on-boarding session yung driver ko and for background check na lang daw po… question ko po eh yung proof of vehicle registration ko eh naka pending pending parin.
Ang sabi po sakin ng eh dapat daw original or/cr ang i-attach ko kaso po nasa bank pa yung original copy kasi hinuhulugan pa po kasi yung sasakyan na niregister namin.
Kaylangan po ba ng original or/cr? Thanks po.
Hi is professional license really needed?
Hi Ken,
If you plan to drive, yes PRO license is required. If you’re an operator and don’t plan to drive, no need to upload your license. Just make sure your driver has PRO license.
Hi, incentives have not been explained during my drivers on boarding today and during the uber partner session I attended at SM aura. An uber driver mentioned that there are a
number of regular rides that uber requires/ week , and there is an excess of that wherein he gets a multiplier of 400Php per ride. Could you Kindly explain this…
Thanks in advance!
Hi Admin,
Can I register a Toyota Hi-ace commuter?
Thanks!
Hi Jay,
Here’s a full list of the cars accepted for Uber Manila:
http://ubermanilatips.com/become-uber-partner-uber-driver/list-of-accepted-cars-for-uber-manila/
Hi Admin,
We have a newly purchased car and we want to register it, but we don’t have a plate number yet. Is it ok or do we need to wait until the plate number was released?
Thanks,
HI,
You can already start the process of registration. You can update your documents once you have the plate number.
hi admin, concern about banking.. can I just change my bank account for the payment.. I already register an account for my banking yet I want to change my bank account.. do I need to go to uber’s office?
Hi Jhun,
No need, just change the details in your dashboard under “Banking”.
Hello, pwede po bang mag submitt na muna kami nung requirements sa step 3 kasi yung step 2 meron na kami kaso si pa namin nakukuha yung card. thank you
I’m hoping for your reply thanks
Hi,
Ask ko lang po kung pwede yung Mazda2 “HATCHBACK” Skyactive. 5-door kasi to eh.. Nakalagay po general requirement under UberX is 4-door lang. Please confirm.
Thanks a lot,
Maya
Hi Maya,
Supposedly it’s accepted.
how about 7 seaters haima van? http://www.haima.com.ph/press_releases_content.php?pageNum_pressreleases=2&totalRows_pressreleases=4
pwede po ba ito?
HI Eric,
Here’s a full list of the cars accepted for Uber Manila:
http://ubermanilatips.com/become-uber-partner-uber-driver/list-of-accepted-cars-for-uber-manila/
bakit di ko ma iregister yong email ng driver ko “username already been registered” eh di pa naman naireregister yon newly created email lang..
pls help…
HI,
Baka po yung driver nyo is an existing driver under a different operator.
Sir,
Is a Suzuki Alto K10 2012 can be apply for Uber compact sedan? And how many days is the processing from issuing the device to the day I could be a Uber partner operator. Thanks.
dan
Can I enroll my Toyota Super Grandia?
HI Red,
Here’s a full list of the cars accepted for Uber Manila:
http://ubermanilatips.com/become-uber-partner-uber-driver/list-of-accepted-cars-for-uber-manila/
Dear Admin,
I’m an uber operator. Once My vehicle and drivers are approved, am i ready to go ? Is the LTRFB acccreditation a mandatory before my driver can go online and drive with uber?
Thank
Hi Admin, currently kakakuha ko lang ng 2015 Suzuki Celerio last Feb and nakuha ko na rin yung Plate number nya last April qualified po ba yung Suzuki celerio sa inyo? also, nagpa-renew ako ng non-pro license ko last May but ang releasing nya by September pa. Ok lang ba mag-apply sa inyo as Uber Driver but I’m planning to change it into PRO license once na ma-release? thank you.
HI JP,
Here’s a full list of the cars accepted for Uber Manila:
http://ubermanilatips.com/become-uber-partner-uber-driver/list-of-accepted-cars-for-uber-manila/
If you plan to drive, your driver’s license has to be professional license.
Hi Uber,
Can i already set up my account even if I haven’t decided yet if ill set up sole proprietorship or partnership as part of the government requirement?
Thanks!
HI RJ,
Yes. You accredit once you’re already an approved partner. For your reference,you can refer to the accreditation process thru the Uber compliance Program
http://ubermanilatips.com/uber-manila-compliance-process-for-ltfrb-accreditation/
hi admin
what if the device that is issued is down, then I use my own device without registering at the office, is it possibly ok???
Hi, pano po yung business name if wala? pag magssign up palang as partner-operator? thanks.
It’s OK.you’ll do accreditation after you sign up.
Refer to this post re LTFRB Accreditation via the Uber Compliance Process
http://ubermanilatips.com/uber-manila-compliance-process-for/-ltfrb-accreditation/
Meron po bng area ang uber sa pampanga
HI Arnold,
Uber’s service area is only in Metro Manila at this point.
It’s OK, you can d accreditation once you’re accepted as a Partner.
For more reference, Refer to this post re LTFRB Accreditation via the Uber Compliance Process
http://ubermanilatips.com/uber-manila-compliance-process-for/-ltfrb-accreditation/
Hi Admin, I am planning to register my Honda Fit car. Is it acceptable? I just saw Honda Jazz in the list of acceptable cars but those cars are just the same. Please let me know. Thanks.
Can I enroll my Ford Fiesta (hatchback) 2015? Again this is NOT the sedan version? I’ve seen hatch uberx cars (accent) but not sure if the Fiesta Hatch can also be used? Thanks.
Hi Jeff, yes it’s possible.
Here’s a full list of the cars accepted for Uber Manila:
http://ubermanilatips.com/become-uber-partner-uber-driver/list-of-accepted-cars-for-uber-manila/
Also, you can use our Partner Invite Code”QPKMY” when you sign up as a partner to get Php 2000 Sign Up Reward after you’ve completed 10 trips.
Remember, your account (as a driver) has to complete these trips. If you’re a Partner-Operator, you can also apply as a driver yourself. It doesn’t count if the drivers under you completed them.
Hi Admin,
May I follow up on my clarification please.
Debie on August 4, 2015 at 6:48 pm
Hi Admin, I am planning to register my Honda Fit car. Is it acceptable? I just saw Honda Jazz in the list of acceptable cars but those cars are just the same. Please let me know. Thanks.
Thank you!
I just wanted to know if mitsubishi adventure 2015 is accepted in uber?thanks..more power!
Here’s a full list of the cars accepted for Uber Manila:
http://ubermanilatips.com/become-uber-partner-uber-driver/list-of-accepted-cars-for-uber-manila/
When is your next schedule that we can attend. If you can send us an email, it would be highly appreciated.
Thanks!
Hi Admin,
is it possible na 2 drivers sa 1 car? plan ko kasi kumuha ng driver tapos pag day-off ko ako naman ang mag-drive.
HI Carlo,
Yes that’s possible.
You can use our Partner Invite Code”QPKMY” when you sign up as a partner to get Php 2000 Sign Up Reward after you’ve completed 10 trips.
Remember, your account (as a driver) has to complete these trips. If you’re a Partner-Operator, you can also apply as a driver yourself. It doesn’t count if the drivers under you completed them. 🙁
Hi,
Can we still use the promo code even if were Uber Partner?
Hi Cathy,
Yes you can use our Partner Invite Code”QPKMY” when you sign up as a partner to get Php 2000 Sign Up Reward after you’ve completed 10 trips.
However, your account (as a driver) has to complete these trips. If you’re a Partner-Operator, you can also apply as a driver yourself, just attend Driver Onboarding. It doesn’t count if the drivers under you completed them.
Hi Adminu
ask ko lang. required ba ang resibo sa pagsubmit ng driver’s license?
may balita kanina about sa registration ng uber sa ltfrb? can you clarify po about that issue?
thank you
Rina
Hi Admin,
Kabibili lang namin ng car and sales invoice pa lang po yung meron ako, yung drivers licence ko is temporary pa lang kasi wala pang issued id. Pwede na ba akong magregister? And yung car is nakapangalan sa wife ko pero ako naman ang magddrive, san ako magreregister partner driver ba or partner operator? Thanks
HI,
Yes, Sales Invoice is OK. You can register already.
You can register your wife’s car. Just make sure that the name in the Proof of Registration matches the name in the Proof of Insurance. 🙂
Here’s the difference between Partner Operator and Partner Driver accounts:
ubermanilatips.com/what-is-the-difference-between-partner-operator-and-partner-driver-account-in-uber-manila/
Also, you can use our Partner Invite Code”QPKMY” when you sign up as a partner to get Php 2000 Sign Up Reward after you’ve completed 10 trips. Remember, your account (as a driver) has to complete these trips. If you’re a Partner-Operator, you can also apply as a driver yourself just attend Driver Onboarding. It doesn’t count if the drivers under you completed them.
Hi Admin,
I am hearing rumors that Uber Philippines will not be accepting partners anymore after August 2015. Please clarify and/or confirm.
HI,
Uber is still accepting partners. 🙂
Hi Admin,
Since we will not have any seminars in the near future, can you advise to me your office phone number instead?
Hi,
How many days does it take to finish the driver orientation/on boarding? How long is the session (in terms of hours)/day.
Thanks!
RJ
HI RJ,
Onboarding session itself will take only 1.5hrs. But the background check after the onboarding takes about 1-2 weeks.
you can use our Partner Invite Code”QPKMY” when you sign up as a partner to get Php 2000 Sign Up Reward after you’ve completed 10 trips.
Remember, your account (as a driver) has to complete these trips. If you’re a Partner-Operator, you can also apply as a driver yourself, just attend Driver Onboarding. It doesn’t count if the drivers under you completed them.
Hi
Our driver is an existing uber driver under a different operator. Can we already submit the form and all the requirements and just drop by in Uber office for driver transfer operator request?
Also, can we submit the application form and to follow LTFRB requirements such as DTI?
Thanks
Hi Cathie,
You and your driver can just go directly to Uber’s office at 3F SMX Aura and request for the transfer. This should take less than 10mins (but the line can take HOURS! hahaha)
Or you can email from your driver’s email address to request for the transfer AND confirm via emailing from your email address.
Thanks.
If we apply for transfer via email, how long will it take to get approval
Also, we’ve already signed up, what’s next?
Thanks.
Dear Admin,
I’m an uber operator. Once My vehicle and drivers are approved, am i ready to go ? Is the LTRFB acccreditation a mandatory before my driver can go online and drive with uber?
Thank
No. you can directly go online.
Honestly, we don’t know anything yet re LTFRB Regulation.
Here’s an Open Letter From Partners and Drivers about the Philippine Ridesharing Regulation. You might want to share
http://ubermanilatips.com/open-letter-from-partners-and-drivers-about-philippine-ridesharing-regulation/
Thanks admin ^__^
Hi,
What documents should we show LTFRB officers if they ask the drivers? Likewise, I heard the news about the Aug 20 deadline, whats it all about?
Will there be any changes after Aug 20?
Thanks,
Hi. My husband applied to be a partner-driver last week, Tuesday, August 4, 2015 at Uber SM Aura and was advised that the approval will take 5-7 working days. To date, we have not received any feedback yet. We are still waiting for the approval before we purchase a car. Does it take more than the given days before they give us approval? Please advise.
Usually 1-2weeks. You can directly follow up with Uber at
hi, pano po pag nahuli ng ltfrb sabi hanggang aug 20 lng ung uber tapos huhulihin daw. sasagutin ba ng uber ung huli? pede nb mag drive temporary lisence lng pero professional wala kc id sa LTO
Honestly, we don’t know anything yet.
Here’s an Open Letter From Partners and Drivers about the Philippine Ridesharing Regulation. You might want to share
http://ubermanilatips.com/open-letter-from-partners-and-drivers-about-philippine-ridesharing-regulation/
What about INSURANCE coverage? Uber requires comprehensive auto insurance but I read the policies of ALL of our cars from different providers. They do not cover if used for hire. Does UBER offer any insurance for my VEHICLE?
I’m worried that if my insurance provider finds out use as operator my policy is voided. But not declaring that is insurance FRAUD isn’t it?
Please advise.
Hi UBER Manila!
My name is Romeo Salcedo, I would just like to ask if I can already claim my device.
As I have seen on my Uber account, the driver status is already ACTIVE, but the vehicles are still on PENDING.
thank you!
Hi Romeo, please directly follow up Uber at
Kelan po kya maayos ung problem nyo with ltfrb? Gusto ko sanang mging partner but kinda hesitant because of the issue. But, are you still accepting partners?
Uber is still accepting partners.
You may want to read this post:
http://ubermanilatips.com/open-letter-from-partners-and-drivers-about-ltfrb-accreditation-and-ridesharing-regulation/
Hi Admin,
For the PNP Clearance for drivers, is it ok to provide a DILG Clearance instead?
Thank you
do i really need to have a company name to be a partner-operator? if yes, how will i create a company name?
Refer to this post re LTFRB Accreditation via the Uber Compliance Process
http://ubermanilatips.com/uber-manila-compliance-process-for-ltfrb-accreditation/
Hi, just want to ask.. My brother in law is in the US and planning to set up an account as partner-operator, is he required for the onboarding session? Also is it possible to use a car which is not under his name as a vehicle on his account? Thanks in advance.
He can create a partner account.
You can enroll in a vehicle under the name of the another person. Just make sure the name on the Proof of registration and Proof of insurance is a match. Please refer to the post above.
So a partner operator don’t have to attend the on boarding session right?
Yes no need if no intention to drive
Is there a demand for Über services in Ilocos Norte?
If so, I am interested.
As of the moment, Uber is only operational in Metro Manila.
hi,is it possible na ipasok ko po yung innova g 2015 nakapangalan po sa company yung invoice??thanks
You can enroll a car even if it’s not under your name. But just check with your company of they will allow it
Hi, I have read some news about LTFRB and Uber where there is a competition between the 2 and that LTFRB is now operating a new taxj called Premium Taxi. They say that Uber has to franchise just like the usual taxi in the PH. But I dont really know what’s happening coz im in the US. But I am really interested, i just want to know how stable Uber is. Thanks.
I am registered as an Uber Rider, and now planning to be an Uber Operator. However when I log using my email as a rider, the next screen message is “Oops! Error Code: 401You’re not authorized to see this page”.. How can this be resolved? Do I need to create a different email then register it as Uber Operator?
You cannot use your same email as a rider. You need to provide another email address.
Hi, I registered my car last Aug. 10, I received an email confirmation. I just want to know the status, can I please get a hotline number on where I can follow it up. Thanks.
You can email Uber to follow up at
So hindi na pwede mag Uber kung hindi ma register sa LTFRB and BiR? Nag sign up nako and mag interview ng driver tomorrow, pero kailangan ko malaman kung papayagan pa ba mag operate kung hindi pa maregister sa LTFRB and BIR? Thank you.
Mukhang kailangan na po kasi may deadline ang filing for LTFRB Accreditation as TVNS.
hi, plano ko po sanang kumuha ng hulugan na car na swak sa requirements ninyo pero wala akong driver na kakilala, ngaun ask ko lang kung may mairerecommend kayo? and
lastly syempre kakayanin kaya yung kita na panghulog sa car kung sakali? thank you.
HI Dhel,
Uber does not recommend drivers.
Sir i have a avanza tourist transport in olongapo city it is ok to be uber partner here in manila?thanks
Yes of course. Just remember that service area of Uber is Metro Manila.
Hello Admin,
Balak ko po sana mag venture into UBER and I am already in the stage na kukunin ko nalang yung brand new na sasakyan. Kaso, panu po yung magiging proseso ngayun since need na dumaan sa LTFRB.
1.) Ako na po ba ang magpupunta sa LTFRB para gawin ang transaction?
2.) Ibig po ba sabihin hindi pwede bumiyahe ang sasakyan ga’t hindi na rerehistro sa LTFRB?
3.) Hindi po ba part ng UBER ang mag rehistro sa LTFRB?
Hoping for your answers before I have my car released.
Regards.
John
Honestly, the process is not yet clear. What’s clear is that you need first to be an approved partner before getting the LTFRB Accreditation. Uber supposedly will help us get the accreditation, but right now, they only ask that we register via the Uber Compliance Program.
Refer to this post re LTFRB Accreditation via the Uber Compliance Process
http://ubermanilatips.com/uber-manila-compliance-process-for-ltfrb-accreditation/
So kung maapprove na vehicle at driver ko ng Uber, hindi pa kami pwede mag operate at mag online until ma accredit ng LTFrB?
I do not have a copy of my last ITR since it got affected by the
Ondoy flood. This Itr was from previous work 10 years ago. Since
then, I have been a stay at home wife and have not recieved income
(thus no recent ITR) I will be starting UBER as a
new business. I DO have my TIN number which I used to apply for a DTI
business name . I do have an NBI clearance, Unified Multi purpose ID
(SSS, Philhealth, GSIS), however they do not reflect the TIN number.
Hi admin, the previous post is with regards to one of the requirements of uber (to sumbit the latest or Last ITR filed with BIR)..
Kindly advise
Thanku
Good day admin! Tanong ko lang kung saan ako pwede mag pa follow-up ng application ko sa uber? Naka receive na kasi ako ng text from uber and kulang pa daw yung docs ko. Nakumpleto ko na ngayon and na upload na lahat ng docs gusto ko na lng ifollow-up for approval. Thanks
You can directly email Uber at
Ok thanks admin. Mga ilang days pa siguro aantayin ko for approval?
hi. I posted my queries a few days ago but apparently, i couldn’t see the reply or the post in this thread. Anyways, i have several queries. I am a regular Uber rider in an Asian country. Firstly, would there be a problem if i register as a partner / operator here in another Asian country and in the PH? How would i go about this? Since i only come to Mnl during my holidays, what would be the best way to go about this? Can I register as a partner/ operator first before attending the info session? Should the car be under my name aside from having the proof of registration and insurance? tnx
hi admin
saan ako pwede magpa follow-up ng application ko s uber? all of my docs are active except the car insurance and the OR/CR. na upload ko na sya ngayon. Thanks.
Hi Admin,
I have a question. We got 2 cars available one is Toyota Fortuner2015 and Toyota Hiace 2014 and gusto namin ipasok pareho sa uber. When i looked at your list of accepted cars wala yung Toyota Hiace. Hindi ba talaga ito accepted? kahit sana palitan sila nung Toyota fortuner sa byahe. I hope i can get immediate response thank you.
HI,
At the moment, Uber does not accept vans and pickups. 🙂
hi admin and to all ask ko lang po if pwde po magapply as part time sa uber as lady driver po sa umaga po from 6a.m.-6:p.m. po except wed. lng po d ako puwede lumabas.wala po akong kotse kasi ung kotse ko na starex old model d ko maipasok sa uber kya makikilabas na lang po muna ako sa ibang me sasakyan po.me account na po ako sa uber nakregister na po ako.sino man po ang need ng lady driver available po ako salamat po.
Hi maritess kailangan ko ngayon ng driver or reliever. Taga cainta rizal ako.kung willing ka pa email mo ako thank you.
Hi Admin,
Is there a membership fee? Or joining fee? Any thing to pay and how much?i heard there’s a fee for joining?
Pwede pa rin po ba nag sign up as partner driver? As i heard nag stop na po kayo?how true?
I am interested with uber to join as partner- driver…
Thank you..
No joining fee. Yes Uber still accepts partner sign ups
hi admin good pm.ask ko lang pag suzuki alto or celerio as of now lang pwede magamit sa uber at hindi pa talaga sure sa ltfrb?im planning kasi na alto or celerio.
Here’s a full list of the cars accepted for Uber Manila:
http://ubermanilatips.com/become-uber-partner-uber-driver/list-of-accepted-cars-for-uber-manila/
Pagtapos mairegister ung bank?..panu nalalaman kung ok na un?..mageemail ba si uber?
Intayin nyo po kung papasok ang payout nyo. Wala pong email si Uber.
hi admin,
naka active na yung acc ko pero sa driver ko ang status pending onboard pa din. ano ang next step na gagawin? kailngan ko pa ba pumunta ng sm aura for report?
Pano po kaya yung sa ITR requirement sa ltfrb. Matagal na po ako unemployed at ngayun lang uli ako nag business through uber. Yung Last itr ko nung employed ako e mga year 2000 pa. Required po kasi ang tin at itr pano po kaya yun? Salamat po.
Refer to this post re LTFRB Accreditation via the Uber Compliance Process
http://ubermanilatips.com/uber-manila-compliance-process-for-ltfrb-accreditation/
Hi Ma’am, Sir
Already upload other requirements…is there any other requirements required to upload?
Thanks and more Power
Once activated as a partner, Refer to this post re LTFRB Accreditation via the Uber Compliance Process
http://ubermanilatips.com/uber-manila-compliance-process-for-ltfrb-accreditation/
Sir pwede pa po ba magpa register sa inyo? Sa saturday ko pa lang kasi makukuha yung nabili ko na kotse
Yes pwede pa po magsign up sa Uber. Sundin nyo lang po ang ste by step guide sa itaas
Hi Admins,
Ask ko lang po, nakapag sign-up na po ako sa http://driveonuber.com/ as a partner-operator, and I was able to view my dashboard na rin. What would be the next step?
Will Uber be sending mails of my next steps?
I also have the documents of my driver.
Please advise.
Thanks in advance,
Regards,
John B
Your driver needs to attend Driver Onboarding.
Here’s a step by step guide on how to be an Uber Partner. Hope this helps.
http://ubermanilatips.com/how-to-be-an-uber-driver-or-partner-in-manila/
Thanks Admin for your response.
I was able to complete the sign-up for my driver. I also received an email informing of my driver’s task, or rather an invite for the onboarding.
My question now, is it okay to let him attend the onboarding yet UBER has not yet approved my application?
Regards,
John
Yes. The driver has to do Onboarding first before you get your whole account approved.
hello, need pa ba ng mayor’s permit at baranggay clearance?
Hi Anne, after being accredited with LTFRB as a business entity. that’s the next step. Watch out for our article re this in the following days. 🙂
Hi
Ask ko lng po kung accredited npo ba ng ltfrb pwde na bumiyahe kahit on process plang sa b.i.r?
Yes. BIR is another story. For as long as you have LTFRB Accreditation, you’re good.
Hi, May I know when will your resume the info sessions? Thanks
Hi miguel, no asvise yet if they’re gonna resume.
You can also refer to this post Partner Info Sessions. Sana po makatulong.
http://ubermanilatips.com/uber-manila-info-session-schedule/
Hi,
Is there a fee for the LTFRB accreditation? how much?
Thank you.
Have a nice day.
Hi,
How much for the LTFRB accreditation?
Thank you.
Refer to this post re LTFRB Accreditation via the Uber Compliance Process
http://ubermanilatips.com/uber-manila-compliance-process-for-ltfrb-accreditation/
hi,balak ko po mag register sa inyo kya lng narinig ko po my franchise na ang uber for ltfrb requirement po ba un , kailan po mag start ? at kung my bayad at how much po??
thanks
Refer to this post re LTFRB Accreditation via the Uber Compliance Process
http://ubermanilatips.com/uber-manila-compliance-process-for-ltfrb-accreditation/
Hi gud pm…gusto kopo mg apply ng driver ang problema nawala ko n ung OR ng drivers license ko profesional..pwede kaya khit walang OR ng drivers license??
Should be fine po. If they reject the document, just email them at
Hi,
I am interested to be a partner driver.
However, I just would like to ask if I can use/enroll my 2015 Ford Ranger since this is my personal car.
Then I also have a company issued car, 2014 Honda City, would it still be possilble for application as well?
Thanks!
Hi JD,
Technically you can however, there might be some legal technicalities with regards to getting the LTFRB Accreditation. Kindly review Uber’s guide about TNVS accreditation here: http://driveonuber.com/tnvsinfo/
Hi!
I am interested to be a partner driver.
However, my personal vehicle is a 2015 Ford Ranger, I could not locate it in any option. Could I still enroll it?
Thanks!
Here’s a full list of the cars accepted for Uber Manila:
http://ubermanilatips.com/become-uber-partner-uber-driver/list-of-accepted-cars-for-uber-manila/
Hi Admin,
Would like to ask what’s the process in adding vehicle? I have added one more under my profile and it’s more than 2weeks and have not received any feedback from uber. I already sent several follow ups and to no avail.
your feedback is highly appreciated.
just bought a eon 2014 reposessed car registration still not under my name but insurance is. can i be partner operator?
Better read on the LTFRB Accreditation first:
http://www.driveonuber.com/tnvsinfo
i saw the (very important considerations). but wala dun yung situation ko na im the owner the owner if the car and deed of sale lang ang meron ako.
thanks for helping
Not sure if Deed of Sale will do because we tried to ask Uber several times but no response yet. You can also email Uber at
thanks
Hi,
Would like to verify the following:
1. When do I apply for DTI registration? Do I apply immediately, even if my Uber application is still awaiting approval?
2. For the banking details in Uber application, when do I upload the banking information? Is it once my application is approved or upon Uber online application?
Thank for your response.
Warm regards.
You need the DTI for TNVS Application.
You can enroll you bank details as soon as signing up. Or latest before you receive your payout.
Hi good day ask kolang tagal kona gustong ipasok ung sasakyan ko pero ang prob ko hindi sakin naka name ung car sa brother ko pero ako nag babayad ng sasakyan, ano kaylangan kong gawin? Nasa ibang bansa kc ung brother ko saka hindi pa cya pwdng ilipat ng name kc binabayaran kopa cya sa toyota, ano po ba pwd kong gawin kc sabi ni uber kung sino ung naka name sa or/cr cya dapat ang operator. Pls help thnks
Pwede ikaw ang operator pero and LTFRB accreditation dapat sa may ari ng sasakyan nakapangalan.
How can i submit the all of my forms?
For TNVS Accreditation? Kindly refer here: http://www.driveonuber.com/tnvsinfo
Hi
Can we still submit the TNVS online? Thanks
Yes, kindly refer to http://www.driveonuber.com/tnvsinfo
Hi admin,
Meron na bang uber service here in davao city? Interesado akong maging partner-operator po, waiting for your reply thnks
As of the moment, Uber is operation in Metro Manila only.
Hi, can I still apply as partner driver for Uber eventhough I am not from Manila? currently residing in Sto.Tomas, Pampanga and no Uber service here yet.What requirement do I have to submit to qualify as partner driver? much interested and pls guide me. thanks
Gd pm. I am to join as an uber partner-driver. I just acquired a bnew vehicle but it is under my brothers name since hes more capable of being approved through bank financing but I’m the one who payed and will be paying for its amortization.
Regarding DTI Business Name Registration. It should be under his name since hes the vehicle owner but the TIN should / could be mine since Im the partner? Am I correct?
All requirements must be from the vehicle owner. Kindly refer here: http://www.driveonuber.com/tnvsinfo
I read in the news that BIR is now requiring income tax payments for uber drivers and operators. Is this true? How much tax needs to be paid?
Kindly refer to this article: http://ubermanilatips.com/ltfrb-accreditation-what-it-really-means-for-us-partners-peers-and-drivers/
Good Day!
Gusto po i apply ng kapatid ko yung sasakyan namin sa uber. Kayalang ang problem po is nasa abroad sya at sa kanya po nakapangalan lahat ng documents. 2015 Model yung car.
Pwede po ba ako na brother nya nalang ang mag apply? And kung pwede po ano po kailngan na requirements?
Thank you Very Much!
You can sign up as the Uber Partner. But the LTFRB Accreditation has to be applied for by your brother. Kindly refer here: http://www.driveonuber.com/tnvsinfo
hi ask ko lang po kukuha po kasi ako ng brand new na vios pede ko p ba ipasok un khit wala pa po ung plate or kelangan ko muna wait ung plate number bago ipasok? if ever pede ko na ba sya ibyahe kahit wala pang plate considering na bago sya. tnx
Yes pwede po.
hi tanong ko lang po paano po ang computation sa kita ng operator at ng driver dito sa uber. thanks.
Hi Jimmy,
Uber takes 20% transaction fee from the gross fares.
Hi,
Is it ok to register as a Driver-Operator first even without the car yet? We are still looking for a car we haven’t decided yet, and were still checking what are the car requirement here. And is it possible to enroll the vehicle that is still under a bank loan?
Hope to hear from you guys. Please advice.
Thanks!
Yes you can do that.
Hi admin
May kotse po ako mirage g4 gusto ko po ipasok sa uber at ako din po ang magdadrive paano po ba
thanks
Just sign up as a Partner-Driver. Then refer here for your TNVS Accreditation: http://www.driveonuber.com/tnvsinfo
Hi admin
pwede na po ba ako mag attend ng on boarding orientation
Thanks po
Hello.. Gusto po kasi ng sister ko ipasok sa uber yung sasakyan po namin pero nasa abrod sya at sa kanya po nakapangalan lahat.
Pano po yung dapat gawin po namin? ipapadrive po namin sa pinsan ko. Nasa abrod po yung sister ko pano po mga requirements po?
Thank you!
Hi Admin,
May plan ako to apply as partner operator. When I’m signing up on the website, hinihingi yung Business name? So I need to get a DTI business name muna tama ba? Thank you
Yes. You’ll need it for TNVS and CPC Accreditation. Kindly refer here for the TNVS requirements:
http://www.driveonuber.com/tnvsinfo
Hi Admin,
Yung sa DTI business permit what type po of business dapat iregister (e.g. Transportation). Also can I register my Innova 2009 model for uber?
Thanks,
Eric
Iwant to be a business partner in uber. Can you help me how to start? Can i get all the requirements. Thank you..
Aside from the requirements posted above, we recommend you go through the TNVS requirements as well at http://www.driveonuber.com/tnvsinfo
Hi, I am looking a driver (uber driver) residing at cainta rizal or near at cainta. Please email me at
Thank you very much. See you soon
Can i enroll my car 2013 Trailblazer as operator & driver even my license is “non-professional”?
Here’s a full list of the cars accepted for Uber Manila:
http://ubermanilatips.com/become-uber-partner-uber-driver/list-of-accepted-cars-for-uber-manila/
If you plan to drive, you need PRO license.
hi admin
nag register na po ako bilang partner driver na download ko na din po ung mga requirments pano malaman kung na approve ako or dis approve
thanks po and more power
You need to upload the documents of your vehicle and drivers then, you’ll need to submit requirements for TNVS. You can also email Uber at
Nag-aabroad po ako at gusto ko pong mag sign up sa UBER. Sa ngayon gusto ko munang mag hire ng driver for 7 months pagkatapos pag uwi ko ako na ang magmamaneho ng sasakyan. ano po ang kukunin kong account Partner-operator po ba o partner-driver? Ano po ang mga requirements? Thank you admin
Partner Operator. Kindly refer to the post above.
Also, you might want to read this: http://ubermanilatips.com/how-to-get-tnvs-and-ltfrb-accredited-in-uber-if-vehicle-is-not-under-your-name/
Hi! Paano if brandnew yung car and wala pa yung or/cr? Pwede na ba iregister yung car sa uber? Thanks
yes
Hi,
Need an advice po. Yung driver ko active na po yung account nya pero once nag-login sya sa application nakakakuha po sya ng error na “Your partner account has not been activated.” Nag-email na po ako sa uber pero di sila sumasagot. Baka po may nakakuha na ng ganitong error dito. Please help po.
Thank you in advance
Antay nyo lang po maactivate. Followup nyo lang po si Uber
Hi admin,
Ask ko lang sa sign up ng partner operator yung part ng business information, kung Hindi pa makapag apply for business name pwede ba to follow yun? Then I update na lang if na apply na sa dti, Or need na agad ng business name na naka register sa dti?
You can update later
Hi Admin,
Yung sa DTI business permit what type po of business dapat iregister (e.g. Transportation). Also can I register my Innova 2009 model for uber?
Thanks,
Eric
Only 2012 models and up are now accepted due to LTFRB regulation. Kindly refer here how to do DTI:
http://ubermanilatips.com/uber-partner-guide-to-dti-online-business-name-registration/
Hi admin!
Good day! Ask ko lang kung mayroon kayong office dito sa q.c to visit and ask some questions regarding uber? Tnx
Do Uber have age limit? For Driver and Operator?
None that we know of. But please consider that driving with Uber (if full time) usually takes 12-15 hours per day. Just take this into consideration if you plan to have someone (senior citizen) to drive.
Nagpatulong po kmi kanina sa isa sa naka partners nyo na magparegistered kaso mali po ung reg nya dapat po ako ung owner tapos kua ko ung driver pano po ba ung ulitin…reg n lng po ba ulit kelangan po ba tin.no.lng o itr pa kc pwd to follow na lng po kc ngpatransfer ako from laguna here in parañaque…
Kindly refer here: http://ubermanilatips.com/how-to-get-tnvs-and-ltfrb-accredited-in-uber-if-vehicle-is-not-under-your-name/
Ayaw po kasi pumasok nung business name ko sa registration d2 sa uber pano po ba
Bakit ho ayaw pumasok? Please refer here:
http://ubermanilatips.com/uber-partner-guide-to-dti-online-business-name-registration/
Good day admin!
Ask ko lang kung mayroon kayong office dito sa q.c.? May mga questions kasi ako.. tnx.
Hi Jett,
Uber does not entertain questions in their offices. You can email them at
or you can get a copy of our ebook guide here.
Btw, UberMNLTips is NOT Uber. We are a 3rd party blog about Ridesharing. 🙂
maari niyo ba akong tulungan nagdrive na ako sa uber pero biglang na deactivate ang account ko paano ko ito muling ipaactivate para muli akong mkapagdrive kasi ipapasok ko sana yong mitsubishi adventure ko na brand new bilang operator driver.
Oh..as much as we want to help. We are not in position. Kindly ask Uber about it at
Hope you can clear it out.
May account n ako s uber as driver, gusto ko sana magpalit ng account as partner-driver. Panu po mapapalitan?
Email nyo lang po ang request sa
Or refer to this post: http://ubermanilatips.com/uber-manila-account-change-from-partner-driver-to-partner-operator/
Hi ask ko lang what if gusto maging driver or partner but wala po akong sasakyan is it possible na maging driver ako?? and paano po kita pag driver lang ako w/o vehicle just a driver??
Hi, you need to have a vehicle. You can find an operator looking for a hired driver. 🙂
sa on boarding po ng driver – start at 11 am to 6pm or anytime pwede pumunta? kung 4pm na pumunta pwede din po? wala siyang ma mmiss na discussion?
hi good day! ask ko lng po kng pwdeng umattend ng driver onboarding khit wala ka pang vehicle ksi under approval pa? o dapat meron ka ng vehicle before you attend the seminar?
Pwede naman. Just make sure you uploaded your driver’s documents online
Hi
I would like to know how to see if my driver is online and how many hours he’s been online. Also, would like to know if I can see his exact location.
Thanks
gud pm, ask ko lng po kung puede po ako umaten ng session or seminar as a Uber Driver
thanks …
As an operator? you can try if papayagan po kayo ni Uber. Pero driver lang po kasi ang inaallow
ako po mismo ang attend ng session Driver pero wala pa po ako sasakyan puede po ako umaten ng session.
may i ask the requirements for the driver is (1)professional driver license or NBI clearance and (2)PNP clearance (police clearance) or it should be (1) PROFESSIONAL DRIVER LICENSE (2) NBI clearance and (3) PNP clearance (police clearance).
You need to have ALL of them
gd am.yong cousin ko may suv.gusto nya register sa uber.ako ang driver.panu po pag apply sa inyo.ofw po sya pero by nov.paalis n dn po sya.thanks
Just follow the procedure above.
Kindly refer to the step by step guide above
once i secure all documents i will just need to upload a scan copy? do i need to submit the hard copy? where and when? is xerox copy of nbi or police clearance ok? since i need the nbi as a requirment for driver lisence as well. thank you
Scan copy will do. Kindly refer here for the guide:
http://ubermanilatips.com/uber-partner-guide-to-dti-online-business-name-registration/
Sorry wrong link. Here’s the TNVS guide:
Here’s UberMNLTips Guide to TNVS and LTFRB Accreditation: http://ubermanilatips.com/ubermnltips-guide-to-tnvs-and-ltfrb-accreditation/
Hi Admin,
Do we have alternatives if the proof of financial statement is not available because I don’t have existing back accounts for personal savings.
Also, I still do not have the the OR CR available since the car is just few days old. Can we use the sales invoice for the meantime to replace the Vehicle Registration and CR category? If yes, what date should we put on the expiry date?
NOTE: Can we do something about the forms that we need to download. We can’t download it because of “too many users are downloading the file try again after 24 hours” error — it is a bit annoying and inconvenient..
Thanks.
Am still waiting for the sign up registration link from you guys after 2 days. When i attempt to resubmit the form, I get a “we have you on our list” but I never got your first email (not even in the spam folder). Can you please check?
Hi Ralph, sorry for that. We’re sending them out this long weekend. Kindly check on your mail. Sorry for the delay. Let us know if you got it. Thanks!
Hi Good morning!
Ask ko lang po kumuha po kasi ako ng Hyundai Grand i10 top of the line. ang kinatatakot ko my nabalitaan ako na next year daw hindi na papayagan ang mga car na 1.2 ang engine at maliit how true is this ? sana hindi naman kasi pang Ube ko talaga yung Car medyo na frighten ako. Thanks
As per LTFRB, there’s no restriction as to engine displacement.
do you have seminar today?
do you have seminar sched today?
Here’s the schedule for driver onboarding. Sana po makatulong.
http://ubermanilatips.com/driver-onboarding-schedule/
Boss tanong ko lang po kung may additional requirements pa po ba kapag pangalawa na yung sasakyan na i uuber? I mean pano po yun do i need to register again and pwede ko napo ba ako mag seminar kahit wala pa yung car for approval pa kasi e..
Just add vehicle. Kindly refer here:
http://ubermanilatips.com/how-to-add-vehicle-in-your-uber-partner-account/
Boss admin.. hi would just like to inquire if i can attend the seminar even if im still waiting for my car to release from toyota.. and would it be possible to apply under my father’s account in uber?
Yes.
Greetings Admin!
I am currently working abroad and few months back, i brought a brand new vehicle under a bank loan. As per the loan terms and requirements, my Mother is the principal borrower and i am the co-mortgagor and my Mothers name appears to be in the Or/Cr and Sales invoice. My question is, am i eligible to apply myself for TNVS accreditation and become a Uber partner operator since i am the one paying for that car loan?
The TNVS Applicant = Vehicle Owner = The name that appears in the ORCR.
Hi good day.. I would like to ask regarding my additional driver, he had his seminar first week of Sept. He was added as my driver but not yet active his status was applied. What do I do. Thank u
If he’s done with Onboarding, you can follow up with Uber at
Admin, interested po ako maging Uber Partner-operator, I already have a vios 2015, please advise on what to do first?
Here’s a step by step guide on how to be an Uber Partner. Hope this helps.
http://ubermanilatips.com/how-to-be-an-uber-driver-or-partner-in-manila/
saan po ba pede idownload ang mga requirements hindi po kasi ako makapasok sa website ng uber
Here’s UberMNLTips Guide to TNVS and LTFRB Accreditation: http://ubermanilatips.com/ubermnltips-guide-to-tnvs-and-ltfrb-accreditation/
Admin, kung sakaling ok npo lahat ng application ko at ng driver, pde npo b magstart ang pagservice ng kotse at kumita kahit wala pa po plate, or/cr pa lang? please advise.. Thank you.
As per Uber, operations as usual. Kindly refer to UberMNLTips’ TNVS FAQs: http://ubermanilatips.com/tnvs-faqs-by-ubermnltips/
hi im having issue registering as a partner as my current email is registered as a rider.
ano po gagawin ko?
You need to use another email address for your Partner Account.
Interested po ko umatend ng info session para mging uber operator when po kya?
Kindly refer here: http://ubermanilatips.com/uber-manila-info-session-schedule/
Hi
kailan po ulit magkakaroon ng info session? thanks!
No advise yet
hi admin,
ask ko lang po sana if kukuha ako ng unit na installment, pwede ko po ba ipasok sa uber or kelangan fully paid ang unit and nakapangalan na ang ORCR sa operator…. thanks,
OK lang kahit under loan pa
how about the charges of uber to operator once done with the application process and already an active uber partner already… do you have 24×7 hotline where we can call for further inquiry and clarification?..
Hi admin!
Naka-submit na kami ng requirements na application at PA for about two weeks na at ang driver ko ay cleared na at nakapag onboarding na. Pwede na ba cyang mag online kahit wala pang PA?
Salamat!
Kindly refer to UberMNLTips’ TNVS FAQs: http://ubermanilatips.com/tnvs-faq-by-ubermnltips/
Hi. I used your referral code. I already completed more than 10 trips. I emailed UBER because i did not receive the 2k referral fee. They are asking for my referrer’s name and email address.
Please send it to
Sent you en email.
ask lang ano gagawin, kc naka sign up ako as partner operator, then nag onboard driver ko kahapon, i dont know if namali ung driver ko ng sabi sa uber representative. kapag inoopen ko na po ung profile ko using my email ad as my user name, profile ng driver ko lumalabas.. pls help. thanks
Kindly email Uber for your concern at
hi! how true po n ltfrb will not accept 1.2L 3 cylinder engine soon?pls see http://manilauberdriver.blogspot.com/2015/09/vehicles-having-3-cylinder-engines-soon.html ..please response po kc im planning to be a uber partner and ung sskyan n kinuha ko ay 1.2 L lng good thing nbasa ko ung blog before aq mkpgdown..hope for your response..thanks.
This is not true. Kindly refer to UberMNLTips’ TNVS FAQs: http://ubermanilatips.com/tnvs-faq-by-ubermnltips/
incase po (wag nmn sana) n dumating ung time n hindi n iaalow ni ltfrb ung mga 1.2l engine affected po b ung mga nkpgregister n or ung mga bgo lng n ssakyn n gnun ung hindi n iaalow?tnx
How can i send my docs, bank details,pictures of the unit,orcd of the unit,car insurance,my driver’s nbi,police clearance,prof license with or
How can i send my docs, bank details,pictures of the unit,orcd of the unit,car insurance,my driver’s nbi,police clearance,prof license with
Ask ko lang saan ko isend ang mga docs like bank details,pictures and details of unit,details ng driver?
Thanks,
hasmin
it’s in this article. Please read. Thanks
Is it possible to use my suzuki forenza 2007 as a uber car ? If so what are the requirements I need to fulfill?
Here’s a step by step guide on how to be an Uber Partner. Hope this helps.
http://ubermanilatips.com/how-to-be-an-uber-driverpartner-in-manila/
hi, how true is it that you are removing cars with suspension lower than 1.3L from the accepted vehicles of Uber? i.e. Mirage G4. Kindly confirm. Thanks.
No. Kindly refer to UberMNLTips’ TNVS FAQs: http://ubermanilatips.com/tnvs-faq-by-ubermnltips/
Hi, I heard that hatchback cars (eon, mirage, wigo, etc.) will soon not be accepted in UBER. is this true?
No. Kindly refer to UberMNLTips’ TNVS FAQs: http://ubermanilatips.com/tnvs-faq-by-ubermnltips/
I heard that hatchbacks will no longer be accepted in Uber. Is this true?
Kindly refer to UberMNLTips’ TNVS FAQs: http://ubermanilatips.com/tnvs-faq-by-ubermnltips/
pwede po bang kumuha ng tnvs sa ltfrb kahit hindi ako ang owner ng car?
Kindly refer here: TNVS if vehicle not under your name: http://ubermanilatips.com/how-to-get-tnvs-and-ltfrb-accredited-in-uber-if-vehicle-is-not-under-your-name/
Gud day
Questions lng po
We are planning to invest Sa transportation business
Pero 2nd hand cars lng sana,
Iba iba po kc un year model ng balak namin kunin 2012-2015
If ever 2012 ilan years namin pwedeng magamit sa byahe?
Or let say
2013
2014
2015
Ilan years sila pedeng magamit sa byahe?
By its year model Po sana
Salamat po
God blessed
Cars must be not more than 3 years old upon application. Once accredited, you can use a car for 7 years.
Good day!
The website http://www.partners.uber.com is always webpage not available. I cannot send my driver’s info and the unit’s pictures,orcr and insurance policy.
Where will I send it?
Thank you,hasmin
Kindly sign up here: https://partners.uber.com/drive/
Hi! Im interested in joining my car to uber. Are you still accepting applicants?.
Uber is continuously accepting. Here’s a step by step guide on how to be an Uber Partner. Hope this helps.
http://ubermanilatips.com/how-to-be-an-uber-driverpartner-in-manila/
mas mbilis po b ang process if ippaad ko nlng s pinsan ko which is uber partner already ung car ko instead n gumawa p ko ng acct? mga gno po ktgal bgo mkapagonboard? so kung halimbawa snkya ko pinaadd ung car means sknya dn ppasok ung kkitain ng sskyan?hope for ur response.tnx
yes sa kanya papasok ang payouts. Pero ikaw parin bilang VEHICLE OWNER ang kailangang magapply ng TNVS Accreditation kahit sa account ng pinsan mo nakapasok ang sasakyan.
TNVS if vehicle not under your name: http://ubermanilatips.com/how-to-get-tnvs-and-ltfrb-accredited-in-uber-if-vehicle-is-not-under-your-name/
Hi, I have now my new license number How can I change it in my profile?
Is it true that vehicle with 3cylinders will soon be not accepted?
Kindly refer to UberMNLTips’ TNVS FAQs: http://ubermanilatips.com/tnvs-faq-by-ubermnltips/
Hi! Question. What if the Driver is 19 years Old. But have a Professional License. Pwepwede ba? Thanks.
HIndi po ba 21 ang minimum under law???
Hi, we have a car but it’s not registered under my name. Can I use it for registration with UBER?
Refer here: TNVS if vehicle not under your name: http://ubermanilatips.com/how-to-get-tnvs-and-ltfrb-accredited-in-uber-if-vehicle-is-not-under-your-name/
Hi Admin
I already submitted my OR/CR but it was returned to me, how will i know the reason why is it rejected?Also my car is still on loan that’s why i don’t have the original OR/CR, is photocopy okay?my name is indicated there as the vehicle owner.
Hoping for your immediate response.
Thanks in advance.
Kindly refer to UberMNLTips’ TNVS FAQs: http://ubermanilatips.com/tnvs-faq-by-ubermnltips/
How to get a driver for an existing Uber car member? The have registered and existing account with Uber under the name of one person for both driver and operator. What is the procedure if we will hire a driver?
Please send us feedback. Thank you.
Menchie
Simply add a driver in your Partner Dashboard. Refer here: http://ubermanilatips.com/how-to-add-driver/
Hi, what’s your contact number? where’s your office located?
Hi! I just would like to ask where can i download the Application Form (for PA). The one that i downloaded is TNVS Application Form. Or they are the same?
Thanks!
Shall I apply for my own DTI? Or will Uber be processing this for me as part of TVNS requirement?
Good Day!
Ask ko lang po pwedi ba mag signup na sa uber kahit for purchase palang ang car?
Technicall you can create your partner account and upload the documents later on once you have the car.
Ask ko lang po is’t true po ba na sinuspinde ng LTFRB sa DOTC ang application ng TNVS? Kumuha na po kasi ako ng car and ipapasok ko po sana paano po yan baka matagalan ang pagapply at process? Worried lang po..
Wala naman pong official news.
Hi! nag sign-up po ako as a driver naupload ko na po yung documents ko sa partners.uber.com. ask ko lang po kung kailangan ko pa po ba magpunta sa sm aura?
Pweda na po kayo mag Driver onboarding
pde n po b mag onboarding driver ko kahit wala p unit..dis november p kc available..
Dapat po uploaded na yung documents ng vehicle at driver before onboarding.
maricon on September 20, 2015 at 11:32 am
hi good day! ask ko lng po kng pwdeng umattend ng driver onboarding khit wala ka pang vehicle ksi under approval pa? o dapat meron ka ng vehicle before you attend the seminar?
Reply
admin on September 22, 2015 at 7:49 pm
Pwede naman. Just make sure you uploaded your driver’s documents online
NABAGO NA PO BA?
Hindi naman. But better if you have the vehicle already documents already.
hi when i login to my partners dashboard it does not show anything theremjust congratulations..how can i upload my details and documents?
Check your email. Uber sends an email. You need to log back in in your dashboard to upload the docs.
Good day, my wife as partner cannot create her profile in first step considering that she has already prepared all the documents to upload. in an attempt to open her profile, my profile is the one opening. I think it was my mistake that I register my name as driver/partner.
Please cancel and clear my name as partner so that my wife can create her
partner profile… thank you so much for your kind consideration..
Kindly email Uber at
Can I attend driver on boarding session if I got nbi and drivers licence only? Is PNP clearance a mandatory requirement?
Can I attend driver on boarding session if I got nbi and drivers licence only? Is PNP clearance a mandatory requirement? Thanks
Better if you have both so your transaction goes smoothly
Pwede ko ba ipasok yung suzuki celerio ko khit wala pang plaka?
Yes. Here’s a full list of the cars accepted for Uber Manila:
http://ubermanilatips.com/become-uber-partner-uber-driver/list-of-accepted-cars-for-uber-manila/
Pede bang gawing uber yung suzuki celerio 1.0 m/t ?
Here’s a full list of the cars accepted for Uber Manila:
http://ubermanilatips.com/become-uber-partner-uber-driver/list-of-accepted-cars-for-uber-manila/
Pwede ba kahit tpl lang ang insurance?
Yes.
Pwede ba kahit TPL lang ang insurance
Yes
Paano po madownload yung mga forms?
baket wala po sa list ang suzuki dzire 1.2 2015
sir gud day bakit po hindi ko ma edit ang gmail ko sa profile ko kz po nagkmali lng pag enter ko ang gmail ko po kz na naka registerd sa uber ay ang na ilagay ko po sa profile ko ay kulang ng 69 bkit po pag nag edit ako hindi naman nagbabago …please help po
Kindly email Uber at
Hi Admin,
My wife and I are planning to get into Uber business. How long po ba will this entire process take?
About 1 month. Here’s a step by step guide on how to be an Uber Partner. Hope this helps.
http://ubermanilatips.com/how-to-be-an-uber-driverpartner-in-manila/
kung may device na po galing uber, pwede na makabyahe? http://ubermanilatips.com/uber-manila-device-options-issuance-schedule/ pano po makakuha ng device?
Hi ask ko lang po kung may mga infosession pa or any seminar para sa mga interested mag join sa UBER? If meron ano po schedule?
AS of now, no advise if and when Uber will resume info sessions. But you can still sign up as a Partner.
Here’s a step by step guide on how to be an Uber Partner. Hope this helps.
http://ubermanilatips.com/how-to-be-an-uber-driverpartner-in-manila/
I’m planning to buy a new car for UBER ano po ba ang ok na pang uber na sasakyan? Nag aaccept pa rin ba kayo? I heard some news na baka di na raw kayo tumangap in the near future.
Here’s a full list of the cars accepted for Uber Manila:
http://ubermanilatips.com/become-uber-partner-uber-driver/list-of-accepted-cars-for-uber-manila/
Pag bumili kami ngaun ng car, how long will it last the operation for uber? Ang sabi kc 3 years lang. It means after 3 yrs hindi na pwedeng gamitin for uber?
7 years. Kindly refer to UberMNLTips’ TNVS FAQs:http://ubermanilatips.com/tnvs-faq-by-ubermnltips/
admin, how can I get pass the “CONGRATULATIONS” part when I log in sa uber? I can’t add a driver if I can’t get in to my dashboard. How can I activate it?
Just login from http://www.uber.com/log-in
Ive already applied as a partner operator.. What will i do next?
thanks
Here’s a step by step guide on how to be an Uber Partner. Hope this helps.
http://ubermanilatips.com/how-to-be-an-uber-driverpartner-in-manila/
I just want to ask about my account? My uber app said that i can go online but when i click the button go online there was an error saying ” you don’t have any vehicle configured”.I already sent all the required documents but still the status of my vehicle docs is still pending. Hope u can help me to expedite my application. Hoping for your immediate response. Thank you very much.
Hi, if your vehicle is not yet active, you can follow up from Uber at
Hi, I just use my nickname not my full name in my UBER profile would that be a problem? If yes is there’s a way I can edit it?
Thanks
Go to your Profile in your Dashboard and edit the name. 🙂
Hi sir, I want to join in Uber partner operator. I have a driver now to be enrolled in uber driver but i need another one driver because im planning to get another one car…..Can i ask if I can get a driver from uber who applied there cause i know you screen them already….thank you…
Uber does not provide drivers po eh. You can try Facebook Groups. 🙂
Hello there! Do we have to wait for the PA to be processed before starting? Isn’t it before after submitting the PA requirements, we can already start?
If we have to wait, how long will it be?
Thanks! 🙂
kung every morning ihahatid ko ang wife ko sa office nya at gagamitin credit card nya as my first trip macoconsider po ba ito na fraud?
If I’m a partner operator can I send an invite (to drive) to my prospect driver(s)? Or say, I am the partner operator, i will send an invite to my husband who is going to be the driver, is that ok?. thanks
If they will be drivers under your Uber Partner Operator Account, you need to add driver in your dashboard.
Kindly refer here: http://ubermanilatips.com/how-to-add-driver/
Hi good day ask ko lng seaman kc ako n gusto ko mag uber as sideline wat f onboard ako for 7months d ba ma void un membership ko khit d ako magbyahe ng matagal? And im using vios 2012 1.5G pde pa ba un? Thanks
Yes, hindi naman sya mavovoid. If it gets deactivated due to inactivity, ipa-activate lang ulit by emailing Uber at
HI good day! I would like ti ask with regard to the difference of SPA with uber and SPA of vehicle with uber. We only downloaded one kind if SPA?
If the Registered Partner is different from the TNVS APPLICANT=VEHICLE Owner, you need to accomplish 2 types of SPA. If the Uber Registered Partner and the VEHICLE Owner= TNVS Applicant is the same, only one SPA. Here’s UberMNLTips Guide to TNVS and LTFRB Accreditation: http://ubermanilatips.com/ubermnltips-guide-to-tnvs-and-ltfrb-accreditation/
Do you accept cars with displacement engine below 1.3? Ex: Eon, I10, Wigo, Picanto.
Thanks.
Yes.
Kindly refer to UberMNLTips’ TNVS FAQ: http://ubermanilatips.com/tnvs-faq-by-ubermnltips/
Hi Ubermnltips! Inquire ko lang, yung car ko kasi registered sa cavite pwede ko ba sya gawing uber dito sa manila? thanks alot!
Yes pwede.
Do you accept a woman driver? I am planning to be a driver of my own car. Is it possible? Thank you
Yes, of course. I’m a female driver myself. 😉
Allowed po ba ang babaeng driver? Thank you
Yes, of course! I’m a female driver myself. 🙂
Hi Admin,
Just want to know. After I signed up, I could not log-in to my dashboard. Does my account need to be activated first by uber? I am still at Step 1. Thanks
Usually you should be able to sign up. Kindly secure your internet connection or try a different browser.
hindi ko ma open ang accnt ko, mukhang na deactivate. An po ang gagawin ko para ma activate uli at ma upload ko ang OR/CR ko.
Kindly email Uber at
hi, already created a profile. I am planning to be the operator and my hubby as the driver, how come when I entered my name, email, location, the next page did not asked me if im an registering as a partner-driver or partner-operator. I also cannot see an option to add a driver. Please help.
You can try and sign up through this link: https://partners.uber.com/drive/?invite_code=xgvim
Hi, ask ko lang po.. I am planning to sign up for uber. I am going to be the operator and my husband as the driver. I already signed up however, I could not see an option to add a Driver on my Dashboard. Will that option become available after the info of the vehicle has been uploaded? Please respond to my email. Thank you!
You should have signed up as a partner-operator (not as a partner-driver). Please email official Uber support at
Trying to browse online pero may nagpo prompt na error,no vehicle is configured on your account….ano po ang gagawin? PA and PAMI processing is on-going.
I uploaded my PNP clearance but I failed to put a thumbark. Will it be rejected? Thank you.
Hi admin, hndi p po ako registered as partner ng uber pero yung driver po namin ay may record na siya bilang uber-driver kailngan pa po ba sya pumunta sa on-boarding and mag submit/upload ng NBI and Police Clearance?
Hi,
Question lang po… nag apply po ako ng car sa financing by the month ma release ang car loan ko.. posible ko ba na ma accredit ito sa uber kahit car loan sya.. thanx
Yes pwede. Kindly refer to UberMNLTips’ TNVS FAQ: http://ubermanilatips.com/tnvs-faq-by-ubermnltips/
Found this in your site.
Once you receive your device, viola! You can go online and drive immediately.
Welcome Uber Partner!
Does this mean, we can go online even we dont have yet the PA.
Thanks
Jia
Kasi si uber laging nag memessage sakin n active na yung vehicle ko pati yung diver ko. Ask ko lang kahit wala pa po bang yung P.A. pwede na po bang maka byahe ? Sana po matulungan nyo ako. Thank you po 🙂
Practically, pwede naman na po. Pero technically, as per LTFRB dapat may Provisional Authority para bumyahe. So, nasa sa inyo na po yun.
Kindly refer to UberMNLTips’ TNVS FAQ http://ubermanilatips.com/tnvs-faq-by-ubermnltips/
How do i know if my docs are active? sa dashboard? last week active na lahat but then i just saw na nawala nanaman yung cr ko. i uploaded it again. so i’m thinking pano yung device mapapaactivate? walk in nalang? no available sched for appoinment sa link https://ubermanila.acuityscheduling.com/schedule.php. thanks!
Simply follow up with Uber at
Tell them you uploaded already and kindly activate the vehicle.
Gud am admin, pwede po ba ako umattend ng driver onboarding kahit po wala pa operator partner,,gusto ko po kasi mag apply as uber driver,,,salamat po
Hihingin po ng Uber yung partner account. Better po if may partner operator kayo. May kaibigan po kami na naghahanp ng driver, baka pwede nyo po ibigay samin ang number nyo or email us at .
Hi! i’m looking for a driver. please contact me via my email . thanks!
Good day!
Sir/Madam,
I dont have the OR/CR right now but I have SALE/VEHICLE INVOICE, Is it ok to upload only the VEHICLE INVOICE for the Proof of Vehicle Registration (OR) and Certification of Registration (CR) in partners-uber account vehicle documentations? but they already reject the first upload that I do.
Hi Admin,
Active na yung mga documents sa profile ko. Ang wala nalang yung dalawa sa baba:
Your PAMI Insurance is missing. Update
Your Provisional Authority / Certificate of Public Convenience is missing. Update
Magsschedule na yung driver ko ng on boarding. Anong susunod dun?
Thank you.
You will get those documents once you passed the requirements for TNVS accreditation. After driver onboarding, antay kayo ng results ng background check after 7 days. After that, once the driver and vehicle is activated, do your TNVS Accreditation.
Hi,
Kapag active na yung Driver and Vehicle pwede na bumyahe since nakalodge naman na yung documents for the PA?
Thank you for the guidance.
John
As of now, kailangan daw intayin ang PA. Para maactivate at makapagdrive.
mam/ sir gud am pano ko po malalaman kung active n ko as operator gnun din po yung driver ko. and pano ko po mlalaman via email po ba ako mkaka recieved? pag nka tanggap po b ako ng approval ano po nxt step kung ggwin? mkakpag operate n po b ako? or my ppasa pa akong requirments? nkpag seminar n yung driver ko po and complete ko n po yung finifill up pan sa dashbord..hopefully w8 your feedback tnx godbless
Hi,
tanong ko lang po yung mga inupload ko na vehicle requirements, nung chineck ko yung dashboard ko mawawala na yung iba inupload ko such as vehicle insurance, anu po yun kelangan ko ba I re-upload?
kaya po ba di pa ng activate yung account ko dahil mawawala yung vehicle insurance?
thanks
hi. i can’t add driver on my account it says ” already exist/added on my other account, just incase i have other account i don’t remember it..what will i do? thanks
You can ask Uber if they can retrieve your other account. You can email them at
good day!
i’m processing my application for PA/TVN but i can’t download the files needed. what should i do? thank you.
good day!
i’m processing my application for PA/TNVS but i can’t download the files needed. what should i do? thank you.
You can try http://www.driveonuber.com/tnvsinfo
may tanong lang po, posible po ba na kumita ako ng 30k + in a month pag nag uber ako?? salamat po..
may tanong lang po, posible po ba na kumita ako ng 30k + 8hr per day in a month pag nag uber ako??
I just wanna know. How true is it na tatanggalin n ang mga compact or hatchback cars, planning to get an hb p nmn. Tnx
No advise yet from Uber or LTFRB
Hello.i’d like to know how long till i can operate with uber assuming i followed everything right.is it true that it will take it a month
More or less. Activation of account, vehicle and driver with Uber will take about 3weeks. Getting Provisional Authority from LTFRB, for us, took us 1.5 months from submission of required documents
Hi! dun po sa tagal na un d po talaga naka-take ng trip ung driver nyo? or nakakapag-take trips na po kahit nagaantay pa lang?
Practically, pwede naman na po. Pero technically, as per LTFRB dapat may Provisional Authority para bumyahe. So, nasa sa inyo na po yun.
Kindly refer to UberMNLTips’ TNVS FAQ http://ubermanilatips.com/tnvs-faq-by-ubermnltips/
Pwede po bang form 1701 ang isubmit instead na certificate of registration? thanks.
Pakitingin na lang po dito ng mga accepted na documents:
Here’s UberMNLTips Guide to TNVS and LTFRB Accreditation: http://ubermanilatips.com/ubermnltips-guide-to-tnvs-and-ltfrb-accreditation/
my car was registered january 2012. Ubra pa po ba gawin Uber ang car ko? Nais ko po sana ma register before 2014 january Ubra pa po ba? Thanks po
The car has to be 3 years olde or newer when you apply them in any TNCs. Kindly refer here:
http://ubermanilatips.com/uber-manila-deactivates-2011-cars-and-older-in-accordance-to-the-ltfrb-regulation/
guys question, ano ano ba yung kailangang isubmit under CPC form (not signed)? I’m quite confused kasi.
Uber texted me na yun na lang daw ang kulang pero sure ako na pinasa ko yun kasi hindi ako makakapag proceed sa next step kung hindi ako nagpasa nun.
Guys please help me out. Ano yung forms na kailangang isama, under CPC form (not signed)? Ano ang kailangang notarized at hindi notarized? please help me. Maraming salamat!
Kindly refer to http://www.driveonuber.com/tnvsinfo
Hello admin,
I already have NBI, Police Clearance and PRO licence. However, I dont have a car yet as I am stucked on which car to get.
Could I still attend the onboarding kahit wala pa akong car? If not, what seminar or sessions you have for people without vehicles yet?
Best Regards
Hello,
I’m driving a 2015 toyota 86 and gusto ko sana ipa register sa uber, for extra income.
Will it be allowed?
Here’s a full list of the cars accepted for Uber Manila:
http://ubermanilatips.com/become-uber-partner-uber-driver/list-of-accepted-cars-for-uber-manila/
Hi admin,
Just inquiring if you know someone who’s interested in becoming an Uber Partner-Driver, preferably living near or in Mandaluyong. Thank you for the help.
And for all the readers, if interested, send your contact details at
Thank you.
Hi admin,
Question, once activated and while waiting for the PA, is the vehicle allowed to proceed with its Uber services?
Also, I would just like to inquire if you know someone who’s interested in being an Uber Partner-Driver. Preferably someone who lives near or in Mandaluyong.
Thank you for the help.
Also for all your readers, whoever is interested in being an Uber Partner-Driver, send your contact details at
Thank you.
Practically, pwede naman na po. Pero technically, as per LTFRB dapat may Provisional Authority para bumyahe. So, nasa sa inyo na po yun.
Kindly refer to UberMNLTips’ TNVS FAQ http://ubermanilatips.com/tnvs-faq-by-ubermnltips/
I have an Uber account and I’m still lacking some requirements.
I’d like to understand further the following requirements and where can I get them:
1. YOUR PAMI INSURANCE IS MISSING.
2. YOUR PROVISIONAL AUTHORITY / CERTIFICATE OF PUBLIC CONVENIENCE IS MISSING.
3. YOUR REAR EXTERNAL VIEW (LICENSE/CS VISIBLE) IS MISSING.
Thanks,
1. and 2, Uber will process them for you once you submitted your TNVS requirements. Kindly refer to UberMNLTips’ TNVS FAQ: http://ubermanilatips.com/tnvs-faq-by-ubermnltips/
3. Take a picture of your car at the back (REAR EXTERNAL VIEW) with Plate NUmber or conduction Sticker visible
Admin, ask ko lang regarding sa pag add ng vehicle, kelangan kasi i-provide yung plate number ng car, kaso wala pa plate nunber yung car namin, ayaw naman nya tanggapin kapag blank yung field ng plate number, pano po yun?
Conduction Sticker. Pakibasa din po sa itaas
hi admin,
question,nag add po ako ng vehicle pero nalagay ko sa plate number ay ung conduction sticker ko. paano po iedit yun? or tama po ba yung ginawa ko since wala pa naman ako plate number. thanks admin. ginamit ko nga pla ref code niyo. thanks
Just email Uber at and attach a picture of your vehicle with your plate number
If kukuha pong driver how much po dapat ang salary namin? any suggestions po. Maraming salamat. 🙂
Depende po sa inyo bilang operator.
ano pong contact number nyo for inquiries? thanks
Hi,
I just signed up as an uber partner-operator and my driver is an existing uber driver since August. Does he still need to attend the driver onboarding/orientation session in Taguig/QC? Or is it ok not to, since he already attended the session back in June?
Thanks!
Kindly check our papers we’re just waiting for our pami insurance so that we can start.
Hi admin,
OFW po ako at sa akin nakapangalan yung kotse. Kasalukuyan po akong nsa ibang bansa. Ask ko lang po kung pwedeng isend ko nlng sa brother ko yung mga downloaded documents fr UBER like SPA’s with my signatures? Pwede po ba na brother ko ang maglakad sa UBER and for LTFRB registration? Yung brother ko po ang magging UBER partner.
Kind regards,
Noel
Hello admin,
questiong lang regarding UBER application. Naupload ko na po kasi mga requirements and status sa OR tab is pending and the rest active na po. Pwede na po ba ako magapply n TNVS/PA? O need ko pa po magwait na maging active yung status sa OR?
Hi Admin,
I already submitted my PA requirements online last Nov. 25. What will happen now with the issuance of a TRO? Will it still be approved after the twenty-day (20) TRO or be rejected already?
Thank you.
Paano ba un application ko sa tnvs mga ilan months po ba ma approved.
For us, it took us 1.5 months from submission of requirements to get our P.A.
gud eve.. admin, f b nakarcv kn ng pipirmahang services agreement at tnvs terms meaning b non approve kn at pwede n bumyahe? and if not wen po possible marcv ung approval?
Approval po ba sa TNVS? Hindi pa po yung email na yun. Iba pa po yun. Antayin nyo lang po ang advise ni Uber or itrack nyo po status ng application nyo dito: http://driveonuber.com/tnvs-application-status-tracker/
Or you can follow up with them at
Hi Uber admin mag inquire lang po gusto ko po sana ipasok ung new mirage po namin sa uber and pumayag namn po father q po ang question q lng po ung unit kc asa name ng father pwede po b ako anak nya operator & driver na din what do ineed just in case pwede po one more thing nag iiscout pa lang namn po anu po pagkakaiba ninyo with other competitor lyk grab po?
Yes pwede po. Kelangan lang ng SPA from your fathers
Hi Admin,
What if gusto ko nang gawing taxi yong uber unit ko? What will happen or what should i do? Cancel ba dapat PA or CPC? Deactivate or just leave it as is? Thanks
Good morning ÜBER Manila Team,
I just literally purchased a car yesterday. However, I wont receive the OR/CR after about 1-3 months as advised by the car dealer. My question is: What would I need to upload instead of the OR/CR?
I am very much interested in joining your amazing company and as an ÜBER Partner soon. Hope you could assist me with this. Many thanks and have a lovely day.
Sincerely,
John
You can upload the sales invoice instead.
Hi! Do you still have orientations on how to become an Uber partner? Do you assist in completing documents/application? Thanks in advance!
Uber has discontinued their partner info sessions, but you can still register as an Uber Partner. Just refer to the guide above. Or you can also get UberMNLTip’s Ebook Guide here.
goodday…
tanong qlng po..pd pdin b mgaply s uber…kc nririnig q..nkhold dw ung operate ang uber ngaun..tanung q po pd pb mg apply..
Sa pagkakaalam po namin tuloy tuloy lang po ang pagtanggap ni Uber ng Application.
hi admain
tanung qlng po..ngregister n aq s uber pati ung car nang pinsan q complte requirment n aq.pero ntigil s balita n nksuspenden ang uber ngaun..kylan po b mg umpisa ang operate ulit ang uber…pd q pdin b ituloy ung pg register q
Tuloy tuloy pa rin naman po ang alam namin.
good day
sir tanung qlng po complte na requirement q.ntigil lng dhil s issue s uber…ask qlng po tuloy pdin b pg tanggap nyo nang aplecant s uber…
thank you
Uber continuously accepts application.
Hello Admin.
I sent an email earlier on… but just wanted to post this query directly in your blogs; as some other people might find your answers useful:
I am a Filipino, who is also a British Citizen (non-dual / non-Filipino). I am fully aware that I may not be able to “own” or “register” a business, due to my citizenship; although this may be resolved by having my fiance / partner register it (as she is a Filipina, who is based in Manila). My queries are:
1) My fiance / common-law-wife / partner will NOT be the ones to drive the vehicle itself and, being based abroad, I could only entrust the aforementioned vehicle to a relative (who would be driving the same). Would that be possible? What are the potential risks, as based on your experiences, with people under the same set-up?
2) Is UBER still deemed as being “profitable” say, for example, a vehicle was purchased via a financing scheme with a bank (or in-house, from a dealer)? What is the average earnings of a 4-door sedan, operating in Manila on a 5-day / 12-hour operation per week? Could you please give us a ball-park figure?
3) Could UBER recommend a financial institution, which could (potentially) qualify us (people who work and are based abroad) ?? The query pops up in mind, in view of the fact that the documents, such as proof of income and permanent employment (for financing pre-qualifications), are all sourced from abroad.
THANKS……
Von Eric
We’re releasing an ebook, drop you email in this link if you want to get updates.
Also, you might want to read up here: http://ubermanilatips.com/tnvs-faq-by-ubermnltips/
hi admin nag register po kc ang friend ko as uber driverpaano po nya makukuha ang 2k pesos sign up bonus?nag ask po kc sya d nya na daw po makukuha?bakit po d makukuha?
paano po magclaim?
If you use our Partner Invite Code”QPKMY” when you sign up as a Partner-Driver to get Php 2000 Sign Up Reward after you’ve completed 10 trips.Remember, your account (as a driver) has to complete these trips.
If you’re a Partner-Operator, you can also apply as a driver yourself, just attend Driver Onboarding. It doesn’t count if the drivers under you completed them. 🙁
Hi Admin,
kung mag sign up ba as driver may 2k incentive po ba na marereceive.
kc po yun friend ko nag sign up as driver sabi po sa kanya wala daw po
marereceive na incentive.
thank you po
You can use our Partner Invite Code”QPKMY” when you sign up as a Partner-Driver to get Php 2000 Sign Up Reward after you’ve completed 10 trips. Remember, your account (as a driver) has to complete these trips.
If you’re a Partner-Operator, you can also apply as a driver yourself, just attend Driver Onboarding. It doesn’t count if the drivers under you completed them. 🙁
UBER ON – Active na yung driver ko and yung vehicle sa partner account ko pero ang sabi ni UBER support bagong policy daw na kaylangang submitted na yung TNVS application sa LTFRB bago iactivate yung vehicle. Confusing kasi dahil active naman na status. Hindi kasi makalog in driver ko dahil dun. May possible way ba para makapagdrive or talagang kaylangan hintayin yung pagsubmit? Magdadalawang buwan na kasi.
Mukhang ganon po ngayon ang patakaran.
Hi Admin, would like to ask about my profile in the dashboard,coz I already uploaded the documents such as Nbi & Driver’s license, now I just want to be an Partner-Operator, Is there anyway that I can delete the files that I have uploaded? Stated above,”No need to upload the documents If there is no plan to drive”. Thanks for your help.
Hi Admin…
Gaano po kaya katagal ang application? Mga ilang weeks po kaya from the application until mag operate ang sasakyan? Thank you.
Uber Partner registration po mga 3 weeks lang. Yung TNVS Application po can take 1.5 months after submitting the TNVS requirements.
http://ubermanilatips.com/tnvs-faq-by-ubermnltips/
hi admin tanung ko lang po kung may mga operator/driver na nagpapasalo ng unit preferably toyota vios? kung meron po just pm me heres my # 09159746011. Sure buyer po ako thanks!
tatangap pba kau dis comming 2016?narrinig ko po kc my tro.tnx
As of now, Uber continues to accept partner registrations.
hi
need pa po ba pwed bumyahe habang wala pa ang tnvs.i mean po my application na ky tnvs pero need pba tau mgantay ng 1.5 months?
Practically, pwede naman na po. Pero technically, as per LTFRB dapat may Provisional Authority para bumyahe. So, nasa sa inyo na po yun.
Kindly refer to UberMNLTips’ TNVS FAQ http://ubermanilatips.com/tnvs-faq-by-ubermnltips/
Hi Admin, would like to ask about my profile in the dashboard,coz I already uploaded the documents by mistake such as Nbi & Driver’s license, now I just want to be an Partner-Operator, Is there anyway that I can delete the files that I have uploaded? Stated above,”No need to upload the documents If there is no plan to drive”. Thanks for your help.
ask ko lang po pwede po ba ang crosswind na 2012?
3 years old and newer po ang tinatanggap ni LTFRB. Refer to this article: http://ubermanilatips.com/uber-manila-deactivates-2011-cars-and-older-in-accordance-to-the-ltfrb-regulation/
My husband already sing up as partner-driver, how can he use partner invite code QPKMY to get the Php2000 sign up reward
Sorry, you need to use it when you sign up. You can’t use it afterwards. Unless, you create a new account and sign up through this link: https://partners.uber.com/join/?invite_code=qpkmy
how come uber have not remitted to our bank. as per uber cut off time for monday remittance is thursday and will reflect on the bank monday afternoon. It is already tuesday noon.
Hi,
My car is in morgage in a bank? Can i still apply for tnvs or be an uber partner? What should i do? In sales invoice it says morgage to eastwest bank, with this can i still use this to apply for tnvs or pa?
Thanks
Yes you can. Kindly refer to UberMNLTips’ TNVS FAQ: http://ubermanilatips.com/tnvs-faq-by-ubermnltips/
Hi Admin,
Question po, if hindi pa po available OR/CR at license plate number ng car, puwede po bang Sales invoice, delivery note at conduction sticker?
I was being asked kasi for the OR/CR and Plate number, pero hindi pa available. andy advice regarding this? para kahit hindi pa available ng process na po sana kami ni Uberr application namin.
Thanks and Regards,
Johanna
hi team,
i uunder ko ung car ko sa brother ko po na operator na ng uber. Question ko is possible ba na ung car nya is under bank nya for payout and ung car ko under sa bank account ko for uber payout? para di magulo po. Thank you
Hindi po. Only one bank account per operator. Why don’t you just create your own Uber Partner Account? Anyway, when you pass the TNVS requirements it’s still under your name.
good day mam/sir
tanung ko lng po..ung car kc nang pinsan un nlng ang ipapasok q s uber,,ask q po ung car kc nang pinsan q hulugan po may or at cr na ang car nya..pero wala p po plate number..pd nb un ,mkoperate s uber khit wala p palte number o kailangan tlg nang plaka bago mkpansada s uber..
samalat po..
Ok lang. Kahit conduction sticker muna. Just make sure na ang ipapasa mong TNVS requirements ay nakapangalan sa Vehicle Owner (which is yung pinsan mo).
TNVS if vehicle not under your name: http://ubermanilatips.com/how-to-get-tnvs-and-ltfrb-accredited-in-uber-if-vehicle-is-not-under-your-name/
thanks admin! last question po, under PROOF OF VEHICLE REGISTRATION (OR), humihingi ng exp date month and year, anu po lalagay ko, diko makita sa sales invoice.
Thank you!
Ask ko lang po, pwede po ba 2-3 drivers sa isang sasakyan? plan po kasi namen na ung husband ko and brother in-law nya ang magda-drive. In case po, partner-driver or partner-operator? Salamat po
Pwede po, add driver lang po kayo. Mag Partner-Operator po kayo para pwede kayo mag-add driver.
I am a foreigner, and have a car, can I apply for Uber Operator and let my private driver drove it?
Thanks.
According to LTFRB rules, a foreigner cannot own/operate a public transport service here in the Philippines. Refer here:http://ubermanilatips.com/tnvs-faq-by-ubermnltips/
Hi! I just want to ask, after the onboarding of the driver, how long does it take to activate the account and have the first trip? The status of my driver’s account is active, while my account as partner is also active, except for my insurance which is pending since I updated it last week. Is this the reason why my driver’s account is still not activated?
Check if you can login sa Uber Partner Driver App. If makalogin na yung driver sa Uber Partner Driver App, ok na., you can go online and accept trips.
Make sure you 1) have submitted complete TNVS requirements 2) have an active driver who have attended onboarding (this can be you if you’re a Partner-Driver) 3) have an active vehicle in your account.
Hi! I’m Jessie may tanong po sana ako gusto ko po sna mgaplay ng UBER pero yung car na bibilhin ko is ung secondhand na galing sa bangko pwede ko ba maaplay yun. Anong year model po ng car pwede mapasok sa UBER..
THANK YOU po!
Yes, for as long as you can have the registration transferred to your name. Vehicles should be 3 years or newer.
Here’s a full list of the cars accepted for Uber Manila, you can also get a car quote in this link:
http://ubermanilatips.com/become-uber-partner-uber-driver/list-of-accepted-cars-for-uber-manila/
Good Day! Ask ko lang po,nag sign up po ako as operator. yung unit po is brand new so wala pa po syang plate number,wala pa din daw pong available plate si LTO,so nung mag submit ako ng requirements for TNVS,sa mga plate number ang nkalagay is yung conduction sticker,accepted po ba yun? tnx po..
Yes conduction sticker is OK po.
ok lang po ba na ang nakalagay sa papers ko for TNVS application regarding plate number is yung conduction sticker nung unit,wala pa daw po kasing available na plate si LTO.
Yes conduction sticker is OK po.
hi,
I can’t read the whole thread here so apologies if this had been asked. I’m planning to register my 2013 CRV(acquired february), puede pa ba ito? I dont have much time to complete the documents required until the 1st half of March. Can i attend the orientation muna then get registered?
thanks,
Jimmy
Here’s a full list of the cars accepted for Uber Manila, you can also get a car quote in this link:
http://ubermanilatips.com/become-uber-partner-uber-driver/list-of-accepted-cars-for-uber-manila/
Uber will actually have a Caravan event this weekend where they will assist you personally. Just mention our Invite Code QPKMY or create an account here then RSVP in this link to be prioritized.
Hi admin,
Good Day, as of now what is the best renting vehicles because i plan to buy and put it to uber. and Also can you please send me a list of the vehicle including the number of how many times their been rent in this past few weeks.
so i can study what vehicle would i buy.
this is my email address
Example:
Toyota :
Inova = 6 times rent in week.
Vios = 3 times rent in a week.
Mutsubishi :
Adventure = 3 times.
Montero = 2 times.
Thnks,
Mark
Here’s a full list of the cars accepted for Uber Manila, you can also get a car quote in this link:
http://ubermanilatips.com/become-uber-partner-uber-driver/list-of-accepted-cars-for-uber-manila/
Hi admin,
Good Day, as of now what is the best renting vehicles because i plan to buy and put it to uber. and Also can you please send me a list of the vehicle including the number of how many times their been rent in this past few weeks.
so i can study what vehicle would i buy.
this is my email address
Example:
Toyota :
Inova = 6 times rent in week.
Vios = 3 times rent in a week.
Mutsubishi :
Adventure = 3 times.
Montero = 2 times.
Thnks,
Mark
Hi admin,
We’ve already submitted the TNVS requirements last February 25, 2016 but have not received any email until now.
My dashboard shows YOUR [UBER TO UPLOAD] PROVISIONAL AUTHORITY / CERTIFICATE OF PUBLIC CONVENIENCE IS MISSING.
Does this mean that I have to wait for the PA before I can start driving.
Thanks,
Andro
Practically, pwede naman na po. Pero technically, as per LTFRB dapat may Provisional Authority para bumyahe. So, nasa sa inyo na po yun.
Kindly refer to UberMNLTips’ TNVS FAQ http://ubermanilatips.com/tnvs-faq-by-ubermnltips/
You can track your TNVS Application here: http://driveonuber.com/tnvs-application-status-tracker/
Or you can follow up with them at
Check if you can login sa Uber Partner Driver App. If makalogin na yung driver sa Uber Partner Driver App, ok na., you can go online and accept trips.
Make sure you 1) have submitted complete TNVS requirements 2) have an active driver who have attended onboarding (this can be you if you’re a Partner-Driver) 3) have an active vehicle in your account.
Hi admin,
We’ve already submitted the TNVS requirements last December 30, 2015 but have not received any email until now. I inquired at LTFRB to follow up the PA, the replied was they have not receive the requirements from uber. Is this true?
Hello Uber!
I have a question regarding the documents. I am a little lost on what to print and prepare.
I am an aspiring Uber partner driver ( car under my name and no other drivers)
This is my question.
Are these the only documents I need to print and prepare?
TNVS APPLICATION FORM
TNVS MOTION FOR PROVISIONAL AUTHORITY
SPA FORM
These 3 only?
How about the following documents? Are these for Partner driver also with one car?
*CPC FORMS
*CERTIFICATION REGARDING LITIGATION PROCEEDINGS AND INVESTIGATION
*TNVS TERMS AND COND
*LFTFRB OPERATOR DATA SHEET
*STATEMENT OF FINANCIAL CAPABILITY
*COPY OF CERTIFICATION
*CERTIFICATION ON AUTHORIZED DRIVERS AND VEHICLES
Hoping for your response. Thanks guys!
These are for after your PA has been approved and released.
Is it possible to get a pdf version of the SPA form indicated in the registration section? Thanks.
Here are the links:
SPA required from all TNVS Applicants: http://ubermanilatips.com/wp-content/uploads/2016/04/MANILA-SPA-Required-for-ALL-Uber-Registered-Partner-UBER.pdf
SPA if Uber Partner is NOT the Vehicle Owner: http://ubermanilatips.com/wp-content/uploads/2016/02/MANILA-SPA-if-you-registered-Uber-Partner-are-NOT-the-vehicle-owner.pdf
I’m planning to be a partner driver. But one of my apprehensions is if my driver drives outside metro manila, say Subic or Clark, can he still be paid of his services?
Uber’s area of service is within Metro Manila only. But if they accept trip within the Uber Platform of trips going to destinations outside Metro Mnila, you will still be paid based on the per minute and per km rate + toll. But if “nangontrata” ang driver outside the Uber platform (hindi nagbook at nagrequest via Uber), ibang story na po yun.
Good day. I just want to ask if there is age limit for the driver? Is driver’s license need to be professional? Is non-professional driver’s license not allowed?
Thank you.
Driver’s license has to be PRO license. No age limit. If you’re an Operator and don’t plan to drive, no need to upload any license.
What if the vehicle is not yet registered under the new owner?is it possible to present the CR/OR under the previous owners name and the deed of sale evedincing the name of the new owner of the vehicle
No. Refer to this article TNVS if vehicle not under your name: http://ubermanilatips.com/how-to-get-tnvs-and-ltfrb-accredited-in-uber-if-vehicle-is-not-under-your-name/
Hi, I just owned a new hyundai eon. My license still a student but soon to be non pro. Can I join uber and be a driver/operator?
or saan ung pinaka malapit na branch nyo na uber so I can drop by and inquire. Around cubao or cainta.
meron ba kaung phone or cc # to contact.?
Hi Kelvin, you need a PRO license. Here’s a step by step guide on how to be an Uber Partner. Let me know if you still have questions.
http://ubermanilatips.com/how-to-be-an-uber-driverpartner-in-manila/
good morning! Ask ko lang po what if the LTO release OR/temporary license only, they dont release card as of the moment due to shortage of materials daw po. I-accept kaya po ng uber ang temporary license or OR para makapag drive po ako ng uber unit? Last week lang po kasi ako nakakuha ng prof license. Thank you!!
kelangan po yung card ng PRO ldriver’s license.
Hi
i like to join Uber but my car is under my company name and the model is 2012 (vios).
can i join? if yes, how?
Thank you.
As per LTFRB, TNVS vehicles should be 3 years or newer. Here’s a full list of the vehicle requirements and accepted cars for Uber Manila, you can also get a car quote in this link:
http://ubermanilatips.com/become-uber-partner-uber-driver/list-of-accepted-cars-for-uber-manila/
hello po,balak kopo kumuha ng hulugan na vios then isali sa uber,20k monthly hulog kaya po kayang kitain sa uber ang panghulog for 3 yrs.ako napo mag drive.may matitira pa po kaya sakin.
hi uber, my brandnew car (SUV) will be released in a week or 2, can i attend the seminar even if hindi pa narelease ung car?. i already filled up some docs with my personal details, thats why im receiving pop-up schedule.. im thinking of getting all documents done before it will be released.. in short, what requirements can i settle, while waiting? tnx.. maxxi
The driver’s PRO license. Because you need the vehicle documents to complete sign up. Yes you can attend
Hi Uber, can we sign up now even if we still don’t have a driver?
Yes sir, you can add your driver when you have. Kindly refer to this link: http://ubermanilatips.com/how-to-add-driver/
If you want some info about how to join uber. Here’s a step by step guide on how to be an Uber Partner. Let me know if you still have questions.
http://ubermanilatips.com/how-to-be-an-uber-driverpartner-in-manila/
Thanks for the reply, one more thing, can we apply two or more driver simultaneously for one car or can we change driver anytime if we find them troublesome?
Hello po, sana pwede na ang Pick up Strada 2016 model po,
Hi Uber,
Ask ko lang kung bakit hindi mabuksan ng driver namin yung ginawa nyong google account para sa kanya? Sa inyo din nanggaling yung password at kaya hindi sa makapag download ng uberdriver application sa google. Complete requirements na kami as operator, kaya lang, hindi pa din nakakapag drive yung aming driver until now.
You can email Uber directly at or go to Uber’s Office in The Square, Greenfields, Mandaluyong to have it your account personally fixed.
Hi Uber,
Correction sa google account ng driver namin. It should be gmail account.
gmail account is ok but yung password is hindi nagmuch sa gmail account nya. Pwede ba namin sya gawan ng new gmail account? or kailangan nya ulit bumalik sa office nyo para maireset nyo yung gmail password nya? Thanks.
Regarding your concern, kindly email Uber directly at
Can you give me the link where to download the TNVS application form?or you can send the form @
Thanks
Here is the link where you can download TNVS application form: http://driveonuber.com/about-tnvs/
Ive already completed my first 10 trips and used your code ,when Can I get the incentive and how can I know if i already have it? Is there any email? Or text message . can i also Ask how can i know if i have incentive as a new partner of uber? New partner of uber shouldve it? Isnt it? Thanks and Godbless
Uber’s incentives is specific per driver. They will email you if you have an incentive for the week so make sure you check your email regularly.
how can i get my TNVS number? im done with my documents and cpc got sticker and ID’s aswell. but i can find my tnvs number
Kindly refer to UberMNLTips’ TNVS FAQ: http://ubermanilatips.com/tnvs-faq-by-ubermnltips/
Do i need to wait for the plastic professional license to register? LTO cannot provide it as of now.
You can upload a copy of the Receipt with stamp as temporary license and a Govt ID.
If you found us helpful share our blog and our page to your friends.
Like UberMNLTips on Facebook.
Best,
UBER MNL TIPS
http://ubermanilatips.com
Hi uber! Paano po makukuha ng driver ko ung payment ng rider, kahit hindi Nya po Ito na end trip
You can report this through the Uber Driver App. under recalculate fare
we bought a brand new car January 2013 but its 2012 model. can we register to uber?
As per LTFRB uber cars must be 3years old or newer. Here’s a full list of the vehicle requirements and accepted cars for Uber Manila, you can also get a car quote in this link:
http://ubermanilatips.com/become-uber-partner-uber-driver/list-of-accepted-cars-for-uber-manila/
If you want some info about how to join uber. Here’s a step by step guide on how to be an Uber Partner. Let me know if you still have questions.
http://ubermanilatips.com/how-to-be-an-uber-driverpartner-in-manila/
We are planning to apply to Uber around August this year2016 but one of our friend told me that it’s not good to apply anymore there at Uber because she said Uber is holding their franchise applications due to pending applicants around 35,000+ applicants pending? Is it true or not? Hoping for your immediate reply because we are now in the process of buying car meant supposedly for business. Thank you.
Uber still accepts sign ups. Uber will activate you within 24-48 hours if you submit the required docs. Submit the requirements so when LTFRB resumes the applications, maipapasa agad ni Uber yung requirements nila.
If you want to get all the details about being an Uber Partner, we highly recommend you watch the replay of the FREE webinar we did a couple weeks back. We guarantee all your questions will be answered plus pioneer and seasoned Uber Partners will give some practical tips at the Q&A portion at the end. You can access the replay here: https://app.webinarjam.net/replay/1010/be1796dcdb/0/0
Also, here’s a step by step guide on how to be an Uber Partner. Let me know if you still have questions.
http://ubermanilatips.com/how-to-be-an-uber-driverpartner-in-manila/
gud pm po almost 1month po bago na aprove car loan ko.kahapon ng txt na bank at toyota agent ko pede na daw na aprove na.tanong kopo totoo po ba na nd na tumatangap ng bagong aplication uber.kasi daw pinahinto muna ng ltfrb pag issue ng tvns.pwede pa po ba mag pasok ng car sa uber.makaka byahe pa po ba kung kukunin ko car na loan ko.
Hi, you can still sign-up and register as a Partner with Uber and submit the requirements so when LTFRB resumes the applications, maipapasa agad ni Uber yung requirements nyo. However as per Uber, vehicle activation might be onhold until LTFRB resumes accepting applications. But driver activation (for Uber Match) is still the same.
Here’s the news article:
http://ubermanilatips.com/ltfrb-halts-acceptance-of-new-tnvs-applications/
Here’s a step by step guide on how to be an Uber Partner. Let me know if you still have questions.
http://ubermanilatips.com/how-to-be-an-uber-driverpartner-in-manila/
Pano ko b malalaman kung nasagot ang tanong ko dito..nahihilo ako..
Uber’s incentives and promos are not guaranteed nor permanent. These may change per week and are specific per driver. Uber sends the incentives weekly via email (both to the driver and the operator). So make sure you check your email regularly.
Bagong driver po ako pano ko po malalaman kailngan ko pa ba pmunta sa office nio to take picture?
H Dennis, anu pong gusto nyo malaman?
My sister owns the car. However, she’s in Saudi Arabia now. We want to register the car in uber but we don’t know what to do. Please help me. Thanks
Hi, kindly refer to link, TNVS if vehicle not under your name: http://ubermanilatips.com/how-to-get-tnvs-and-ltfrb-accredited-in-uber-if-vehicle-is-not-under-your-name/
If you want to become a Uber Partner. Here’s a step by step guide on how to be an Uber Partner. Let me know if you still have questions.
http://ubermanilatips.com/how-to-be-an-uber-driverpartner-in-manila/
Hi admin! Is it posible to register an SUV as uberX instead of UberBlack?
Hi Nathan, here’s a full list of the vehicle requirements and accepted cars for Uber Manila, you can also get a car quote in this link:
http://ubermanilatips.com/become-uber-partner-uber-driver/list-of-accepted-cars-for-uber-manila/
If you want to become a Uber Partner. Here’s a step by step guide on how to be an Uber Partner. Let me know if you still have questions.
http://ubermanilatips.com/how-to-be-an-uber-driverpartner-in-manila/
Hi! I am in the process of the joining Uber. I am planning to be a Partner Operator only. With that being said, what name should I register when I create an account in partners.uber.com? Should it be my name since I am the owner of the account or should it be the driver? Same as with the picture to be uploaded.
aside ba s gagastusin namin para s tnv ng ltfrv may kailangan pa ba kaming bayaran kapag
ng member kami sa uber?at how much
There’s no fee to register with Uber. Uber only takes 25% service fee from your gross fares when you start driving. However, there is fees for LTFRB TNVS accreditation which costs around Php 5000. But Uber will process this on your behalf and charge you after submission which they deduct from your payout. So there’s no cash out to register and get activated in Uber.
hyundai Eon 2014, pwede po magamit sa UBER?
Hi Teehjay,
Here’s a full list of the vehicle requirements and accepted cars for Uber Manila, you can also get a car quote in this link:
http://ubermanilatips.com/become-uber-partner-uber-driver/list-of-accepted-cars-for-uber-manila/
Bkit ndi ko po makita sa trip history ko ung last trip ko kanina Aug.12,2016?
Hi..bkit ndi makita ng driver ko ang last trip nia? Kgabi pa*.
Ask ko lng po kung pinasok ko car how soon po pwede ako mag start kung complete na requirements? Suspended pa rin ba application for u er sa ltfrb?
Uber still accepts sign ups. Uber will activate you within 24-48 hours if you submit the required docs. Submit the requirements so when LTFRB resumes the applications, maipapasa agad ni Uber yung requirements ninyo.
Also, here’s a step by step guide on how to be an Uber Partner. Let me know if you still have questions.
http://ubermanilatips.com/how-to-be-an-uber-driverpartner-in-manila/
So kapag po naactivate na ang account, pwede na po ba bumyahe kahit pending pa ang application ko sa LTFRB?
Yes po, once Uber activate your account, you can go online ang accept trips.
HI Mark. Follow-up question lang kay admin.
Sir pano naman po kung halimbawa mahuli yung operator na bumabyahe kahit naka pending pa sa LTFRB yung application. ano po ang pwedeng palusot para di ma-impound yung unit?, mahal pa naman ng tubos.
Hi Abel,
In case something happens, according to Uber, they will provide legal assistance to Uber Partners (makes a better case if you’ve already submitted your TNVS requirements). All you need to do is email them in case something happens. Uber will tell you this if you email them or ask them directly in one of their Info Sessions.
Hi..bkit sa email ko na nrcv from uber is 10trips ang target ko after the cutoff nakita ko nlng sa computation bglang 13trips na..anong ngyri?
I want to register as an Uber Operator but I will have the car in the next few weeks to come and I just have a Non Pro driver’s license, how shall I start?
HI Christian, you can already create an Uber Partner account and just complete the sign-up once your vehicle arrives. If you plan to drive, you have to secure a PRO Driver’s License. But if you don’t plan to drive, you don’t need a PRO license. Just make sure that your driver has a PRO Driver’s License. You can create an account here: http://bit.ly/ubermnlsignup
opon b tomorrow aug. 29 ang activation centers khit holiday?
how much ang fee for activation?
Hi, there’s no fee to register with Uber. Uber only takes 25% service fee from your gross fares when you start driving. However, there is fees for LTFRB TNVS accreditation which costs around Php 5000. But Uber will process this on your behalf and charge you after submission which they deduct from your payout. So there’s no cash out to register and get activated in Uber.
Here’s a step by step guide on how to be an Uber Partner. Let me know if you still have questions.
http://ubermanilatips.com/how-to-be-an-uber-driverpartner-in-manila/
I have seen advertisement for uberHOP. Are you accepting vans for this category?
Hi Cielo, Vans and pick ups is not already accepted in Uber Manila.
Here’s how to join UberHop Manila. Hope this helps.
http://ubermanilatips.com/partner-tip-join-uberhop-manila/
hi. is baic m20 allowed as a vehicle in uber?
Here’s a full list of the vehicle requirements and accepted cars for Uber Manila, you can also get a car quote in this link:
http://ubermanilatips.com/become-uber-partner-uber-driver/list-of-accepted-cars-for-uber-manila/
Can we start accepting trips even if the PA is not yet released/approved?
Practically, it is ok. But technically, as per LTFRB you must have Provisional Authority before you can start driving. So, it’s up to you.
Kindly refer to UberMNLTips’ TNVS FAQ http://ubermanilatips.com/tnvs-faq-by-ubermnltips/
Hindi po ba suspended ang pag issue ng PA gaya ng franchise?
As of now on-hold parin po ang acceptance of new TNVS Applications but, Uber still accepts sign ups. Nagaactivate po ang Uber within 24-48 hours kung nakasubmit po kayo ng lahat na mga requirements.
Hi Admin – May bayad po ba mag pa register? if so – how much? na pwede din po ba gamitin yung Toyota Wigo 2016? and financing po kasi tong Auto ko, ma aapektuhan po ba monthly ko din sa banko pag nag uber ako? please pasagot po, thanks!
Hi Raymond,
All your questions are answered in this webinar, if you will only take time to watch and learn more about the business you want to join into: https://app.webinarjam.net/replay/1010/be1796dcdb/0/0
There’s no fee to register with Uber. Uber only takes 25% service fee from your gross fares when you start driving. However, there is fees for LTFRB TNVS accreditation which costs around Php 5000. But Uber will process this on your behalf and charge you after submission which they deduct from your payout. So there’s no cash out to register and get activated in Uber.
Here’s a full list of the vehicle requirements and accepted cars for Uber Manila, you can also get a car quote in this link:
http://ubermanilatips.com/become-uber-partner-uber-driver/list-of-accepted-cars-for-uber-manila/
Also, here’s a step by step guide on how to be an Uber Partner. Let me know if you still have questions.
http://ubermanilatips.com/how-to-be-an-uber-driverpartner-in-manila/
Hi Admin! can you send me the full amount of expenses of registering here in uber? hoping for your response. Thanks!
here’s my email:
Hi Randy, there’s no fee to register with Uber. Uber only takes 25% service fee from your gross fares when you start driving. However, there is fees for LTFRB TNVS accreditation which costs around Php 5000. But Uber will process this on your behalf and charge you after submission which they deduct from your payout. So there’s no cash out to register and get activated in Uber.
In case you need, here’s a step by step guide on how to be an Uber Partner. Let me know if you still have questions.
http://ubermanilatips.com/how-to-be-an-uber-driverpartner-in-manila/
Admin my unit kami from zambales.gusto naming ipasok sa uber jan sa manila and ung driver q from baguio hindi sya residente ng manila.maapprove b kaya ung application namin sainyo
Yes po, basta meron syang Professional Driver’s License. Here’s a step by step guide on how to be an Uber Partner. Let me know if you still have questions.
http://ubermanilatips.com/how-to-be-an-uber-driverpartner-in-manila/
Hinuhulugan ko ang sasakyan ko sa Company, na Inutang din ng Company sa Bank Leasing.
Anong kailangan kong gawin para makapag apply ako as Uber Partner?
Salamat,
P.A.A.
Here’s a step by step guide on how to be an Uber Partner. Let me know if you still have questions.
http://ubermanilatips.com/how-to-be-an-uber-driverpartner-in-manila/
Hi! I have a question. This is regarding the accepted cars for Uber. Let’s say I joined and I enrolled my 2013 Kia Picanto this year, what happens with it in 2017? Will I still be able to use it, or will my contract with Uber just ends?
The CPC of your car can be renewed up to 7 years from the first issuance of the CPC Franchise. So you can only use your car in 7 years.
Hi I cannot access my account i forgot my password tnx
Regarding to your concern, kindly email Uber at
gud pm,tanung ko lang dati nako naka register as driver sa uber, bibili na sana ako sa sarili ko kotse kailangan ko pa din mag sign up sa uber partner?tnx
hi question po pwede pa kaya yung Innova March 2013?
Hi Harold, here’s a full list of the vehicle requirements and accepted cars for Uber Manila, you can also get a car quote in this link:
http://ubermanilatips.com/become-uber-partner-uber-driver/list-of-accepted-cars-for-uber-manila/
question po. yung kapatid ko balak maglabas ng car at mag Uber daw sya. pero hindi ba stop na ang franchise ng LTFRB for UBER applicant? mapilit kasi baka mamaya nakalabas na sya ng car tapos deny naman pala application nya kawawa naman pag nagkataon.
TIA
Hi Jeff,
Yes pwede pa po syang mag apply. Uber still accepts sign ups. Uber will activate you within 24-48 hours if you submit the required docs. Submit the requirements so when LTFRB resumes the applications, maipapasa agad ni Uber yung requirements ninyo.
If you want to get all the details about being an Uber Partner, we highly recommend you watch the replay of the FREE webinar we did a couple weeks back. We guarantee all your questions will be answered plus pioneer and seasoned Uber Partners will give some practical tips at the Q&A portion at the end. You can access the replay here: https://app.webinarjam.net/replay/1010/be1796dcdb/0/0
Also, here’s a step by step guide on how to be an Uber Partner. Let me know if you still have questions.
http://ubermanilatips.com/how-to-be-an-uber-driverpartner-in-manila/
Hi,
Ask ko lang po kung may seminar pa sa SM Aura?
Hi Rusty, here’s the schedule of the Partner Info Sessions. Sana po makatulong.
http://ubermanilatips.com/uber-manila-info-session-schedule/
Hi Good day,
i have Question.
im now a Uber Operator
nag aayus ako now ng P.A Requirements ko..
kasama sa ipapasa ko is Professional Driver’s License.
what if i dont have Pro Licence, should i upload my Driver’s License? (yung driver ko na nag drive ngayon ng uber car ko)
kasi di im Operator lang.
Pls answer asap. thanks
im planning po kumuha ng sasakyan pang uber.pano po pag hindi sa pngalan ko yung sasakyan pero ako po ang magddrive mismo..ano ano po ang mga requirements ?
Makakaybhe po b ako once na mag apply ako..kahit na naposponed ang application sa tnvs..ano po ang kaylangan ko. .iaccomplished para legal akong mkbyhe..yung PA ano po b yun.at ano po ang purpose nun san po yun inaaply ano po ang requirements nun…?yung tnvs kaylan po maibblik ang pagtangap ng application..
at san po iaaply un..ano ano po ang reuirements nun..kaylangan ko b hintayin muna lahat un bgo mkbyahe sa uber..
.
Kindly refer to UberMNLTips’ TNVS if vehicle not under your name FAQ: http://ubermanilatips.com/how-to-get-tnvs-and-ltfrb-accredited-in-uber-if-vehicle-is-not-under-your-name/
If you want to get all the details about being an Uber Partner, we highly recommend you watch the replay of the FREE webinar we did a couple weeks back. We guarantee all your questions will be answered plus pioneer and seasoned Uber Partners will give some practical tips at the Q&A portion at the end. You can access the replay here: https://app.webinarjam.net/replay/1010/be1796dcdb/0/0
Also, here’s a step by step guide on how to be an Uber Partner. Let me know if you still have questions.
http://ubermanilatips.com/how-to-be-an-uber-driverpartner-in-manila/
Good day! Is it okay if there is no PNP Clearance only NBI Clearance and Driver’s License? Thank you
All drivers should have a PRO driver’s license. If you don’t plan to drive and just plan to register as an Uber Partner-Operator, you don’t need to upload any driver’s license at all. Just make sure that the drivers under you have PRO Driver’s license.
Good morning po, mayroon po akong Montero 2009 model and done only 25,000 kilometer. Color po ay silver. Pwede pa po ba ito ienroll sa Uber. San po ito maigroup sa UberX or Uberblack.Please advise the soonest.
Tungkol sa van na man po, may opening na po ba kayo para sa NV350 VAN 2016 model as Uber partner.
Thanks,
. Therry
As per LTFRB, Uber cars must be 3 years old or newer. If you want to get all the details about being an Uber Partner, we highly recommend you watch the replay of the FREE webinar we did a couple weeks back. We guarantee all your questions will be answered plus pioneer and seasoned Uber Partners will give some practical tips at the Q&A portion at the end. You can access the replay here: https://app.webinarjam.net/replay/1010/be1796dcdb/0/0
Also, here’s a step by step guide on how to be an Uber Partner. Let me know if you still have questions.
http://ubermanilatips.com/how-to-be-an-uber-driverpartner-in-manila/
Ang hassle naman ng website nyo… gusto ko mag uber partner may sariling car at may driver… so uber operator saan ako pwede mag sign up? Lagi kasi sa web nyo is driver ang hanap walang access about sa operator… saan ba ang office nyo ant mapuntahan nalang
Here’s a step by step guide on how to be an Uber Partner. Let me know if you still have questions.
http://ubermanilatips.com/how-to-be-an-uber-driverpartner-in-manila/
how can i remove my Past driver in my account?
can Uber help me to find a Perfect Uber Driver?
im a Operator of Uber app.
hello, car owner and driver din sana ako, kaso non-pro license ko, pwede naba yun??? thank you.
Kailangan po may Pro Driver’s License kayo.
Hi Just want to ask anu 1st step ko para maging uber partner? wala pa ako OR CR meron ako sales invoice and delivery note pwedi naba un? thank you
Hi Angie, here’s a step by step guide on how to be an Uber Partner. Let me know if you still have questions.
http://ubermanilatips.com/how-to-be-an-uber-driverpartner-in-manila/
How about pala ung NBI nun driver pinababalik kasi xia kasi madami kapangalan after 2 weeks pa pwedi bang receipt muna??
sabi nila close na daw d na kayo accept pa. totoo ba?
Uber still accepts sign ups. Uber will activate you within 24-48 hours if you submit the required docs. Submit the requirements so when LTFRB resumes the applications, maipapasa agad ni Uber yung requirements ninyo.
Hi admin. ask ko lng po kung pwede yung kotse ko for UBER? nabili ko yung kotse ng brand new nung january 2013 pero Honda Civic 2012 model sya.
Here’s a full list of the vehicle requirements and accepted cars for Uber Manila, you can also get a car quote in this link:
http://ubermanilatips.com/become-uber-partner-uber-driver/list-of-accepted-cars-for-uber-manila/
In case you need, here’s a step by step guide on how to be an Uber Partner. Let me know if you still have questions.
http://ubermanilatips.com/how-to-be-an-uber-driverpartner-in-manila/
Great and helpful site! My TNVS application, it says PA reviewed / CPC status incomplete. Does this already allow me to start driving for Uber?
After successful and complete upload of your requirements in your Partner Dashboard, Uber will notify you via email/SMS that your account is activated within 2 days. Once your account is activated you can go online and accept trips.
Pwed ko bang i send tru email ang aking account no.at debit card ko?
Here’s a step by step guide on how to enroll your banking details: http://ubermanilatips.com/how-to-enroll-edit-bank-account-details-receive-uber-payout/
Hi am interested! I have a car na gusto ko i-uber. Wigo. Ako rin magdadrive. Where can I call kaya? Mas gusto ko kasi me makausap kesa email lang para maguide ako pano magregister/partner. Thank you so much.
You can go to Uber’s Office in The Square, Greenfields, Mandaluyong to have a personal assistance by an Uber support staff. Operating time is 9am-5pm
Ano po recommended internet nyo para Uber? Meron po bang Unlicall / Unlitxt + 3GB.
Thank you po.
Refer to this post: http://ubermanilatips.com/best-mobile-data-plan-for-uber-manila/
Hi,
I want to sign up but have some questions first. If ever I’m already activated and submitted all docs needed for the TNVS, will I be issued a PA? and my 2nd question is, if I’ll be getting said PA, how long at the very least or the most will it take to acquire such document? I’m a bit uncomfortable just being activated and not having a PA. Thanks.
How can I re submit the requirements for PA. I already applied for the PA but after a week or two is was already reviewed and the status is not ok. I need to resubmit the OR-CR of my car and the correct SPA but i cannot see the link or space to resubmit the document. I can view the edit form but there is no link there for resubmission of the OR-CR. Do i need to re apply for a new PA so i can submit everything again?
You can go to Uber’s Office in The Square, Greenfields, Mandaluyong to have your issue fixed personally by an Uber support staff. Operating time is 9am-5pm
Ask ko lang po kung one if your requirements is a franchise fee of P10k to be an uber driver.
There’s no fee to register with Uber. Uber only takes 25% service fee from your gross fares when you start driving. However, there is fees for LTFRB TNVS accreditation which costs around Php 5000. But Uber will process this on your behalf and charge you after submission which they deduct from your payout. So there’s no cash out to register and get activated in Uber.
Ask ko lang admin if possible to attend the session kahit wala pang car?
Yes po, if kung gusto nyo lang magkaroon ng idea on how to be an Uber Partner. Refer to this post: http://ubermanilatips.com/uber-manila-info-session-schedule/
Hi!
Is there an age limit for drivers?
There’s no age limit to an Uber Driver, as long as he has a Professional Driver’s License.
Ni refer ko po yung brother ko last Nov.24. Naka complete na po sya ng 10 trips, and naka receive na rin po ako ng email nung Dec.9 na entitled nako sa 3k and ma cecredit daw eto sa next cut-off which is this week. Pero kahapon, naka receive ako ng text message na na flag daw yung account for the improper use of Uber app and hindi na raw ako eligible sa mga referrals. Ang malupet pa nito eh binawi nyo yung 3k sakin. Hindi na sya nag rereflect sa dashboard ko. Nag submit nako ng feedback complaint kahapon, which is hanggang ngayon wala pang feedback. Ang gusto ko lang malaman eh anong reason kung bat na flag yung account ko at bakit pati referral ko ang tinanggal nyo? Mali ba mag refer ng kapatid?
For your Partner/Driver concern, we recommend you report the concern via:
1. Uber Driver App. Select the Trip > Help > Select the issue
2. Uber Help Center. Go to https://help.uber.com, select city as Manila and choose “For Partners”. Sign in with your Partner/Driver account and select your issue/concern.
3. You can also go to Uber’s Office in The Square, Greenfields, Mandaluyong to have your issue fixed personally by an Uber support staff. Operating time is 9am-5pm
Dear Admin,
Meron na ako account sa UBER pero ng buksan ko ito humihingi ito ng Verification na which is hindi naman hinihingi noon. Ang problema ang verification code ay pwede lang isend sa cp number which is di ko na ginagamit. DI ko na mabuksan ung UBER account ko as operator/partner.
Try ko tawagan ang UBER pero wala sila contact number na pwede tawagan.
For your Partner/Driver concern, we recommend you report the concern via:
1. Uber Driver App. Select the Trip > Help > Select the issue
2. Uber Help Center. Go to https://help.uber.com, select city as Manila and choose “For Partners”. Sign in with your Partner/Driver account and select your issue/concern.
You can also go to Uber’s Office in The Square, Greenfields, Mandaluyong to have your issue fixed personally by an Uber support staff. Operating time is 9am-5pm, here’s the schedule of Partner Activation Centers: http://driveonuber.com/schedules/
Hello Uber,
Gusto ko po sana mag inquire and makasigurado if everything is okay na. nakakuha na po ako ng sasakyan, nkpag pareserve na ako and next week mag ffull downpayment na po ako. ang kinuha ko is Toyota Vios 1.3e MT sedan type. for the requirements nyo eto na po yun meron ako.
-Valid ids(UMID, drivers license, TIN, company id)
-NBI clearance nung driver ko
bale ako po yun operator then dad ko yun driver ko at next week pagka full downpayment namin baka after 1week marelease na yun sasakyan. gusto ko po sana makasigurado na mkakapasok po ako as your partner in Uber? may mga other criteria po ba na possible mareject ang application ko sa inyo?
-JL
Just follow the step by step guide and complete all of the necessary requirements.
Thank you!
Hello Uber admin,
More power po sa inyo, may tanong lang po ako ulit. pwede po ba bumiyahe kahit na wala pa LTFRB? Let’s say na nakapag apply na po sa uber nabigay na lahat ng documents and na fill up n yun forms for LTFRB. As per Uber, kayo na mag aasikaso for LTFRB once na nafill up na yun mga forms, correct po? if so, how many days un processing and while we are waiting for the documents from LTFRB(PA and CPC). Is it okay na bumiyahe? meron ba tayo temporary document na pwede ipakita in case n mahuli na ongoing pa yun prangkisa.
We really appreciate your response on this. Thanks!
Godspeed!
-JL
Any updates sa above concern ko? -JL
kung magaaply po ako ngayon year ok po ba ang honda civic ek sedan with insurance at updated register?
Here’s a full list of the vehicle requirements and accepted cars for Uber Manila, you can also get a car quote in this link:
http://ubermanilatips.com/list-of-accepted-cars-for-uber-manila/
Hi,
Nakapag create napo aq ng account ,driver-operator po ako. Nessaary pa po ba ang NBI or kailangan lang po yun if mag hhire ako ng driver?Pangalawang tanung ko po, after ma complete yung account, pano po malalaman if approved na yung application?
Thanks
Refer to this post: http://ubermanilatips.com/tnvs-faq-by-ubermnltips/
After successful and complete upload of your requirements in your Partner Dashboard, Uber will notify you via email/SMS that your account is activated within 2 days.
Pwede pa din ang 2016 kia picanto? I dont see it anymore it the list of vehicles allowed. Please let me know. Thanks
Can i registered 2017 MItsubishi Adventure GLS Sport ? And in what category or line this kind of vehicles.
Thanks
Here’s a full list of the vehicle requirements and accepted cars for Uber Manila, you can also get a car quote in this link:
http://ubermanilatips.com/list-of-accepted-cars-for-uber-manila/
I created an account pero bakit pinapaupload ako kaagad ng pro driver’s licens and or cr? partner/operator ako
Kindly upload the license of your driver and the OR CR or Sales Invoice of your vehicle.
Admin,
nag resume na po ba ang TNVS application sa LTFRB. kung di pa po pwede pa din po ba maging partner ng UBER.
Yes, Uber still accepts sign ups. Uber will activate you within 24-48 hours if you submit the required docs. Submit the requirements so when LTFRB resumes the applications, maipapasa agad ni Uber yung requirements ninyo. Refer to this link: http://ubermanilatips.com/ltfrb-halts-acceptance-of-new-tnvs-applications/
Also, here’s a step by step guide on how to be an Uber Partner. Let me know if you still have questions.
http://ubermanilatips.com/how-to-be-an-uber-driverpartner-in-manila/
Admin,
Does it means I can accept trips once my account was activated?
I already upload the OR/CR of my vehicle for the completion of requirement for CPC. how many days processing of CPC
Hi Admin,
I already uploaded my documents as driver (NBI, Proof of filipino & Professional Drivers license) Up to now there’s no info email or text me that Im approved. May i know what is the next step for me?
Admin,
nag resume na po ba ang TNVS application sa LTFRB? in case na hindi pa pwede pa din ba maging partner ng uber?
Yes, Uber still accepts sign ups. Uber will activate you within 24-48 hours if you submit the required docs. Submit the requirements so when LTFRB resumes the applications, maipapasa agad ni Uber yung requirements ninyo. Refer to this link: http://ubermanilatips.com/ltfrb-halts-acceptance-of-new-tnvs-applications/
If you want to get all the details about being an Uber Partner, we highly recommend you watch the replay of the FREE webinar we did a few months back. We guarantee all your questions will be answered plus pioneer and seasoned Uber Partners will give some practical tips at the Q&A portion at the end. Click to watch the webinar replay here.
Also, here’s a step by step guide on how to be an Uber Partner. Let me know if you still have questions.
http://ubermanilatips.com/how-to-be-an-uber-driverpartner-in-manila/
Hello po. sa friday may info session po ba s mga bago mag aaply? partner-operator ako then papa ko partner-driver ko. aattend sana kami? Ano oras po at saan location?
Hi,
Pwede po ba ang Hyundai Eon? and may question lang po ako dito.
“Uber will activate you within 24-48 hours if you submit the required docs. Submit the requirements so when LTFRB resumes the applications, maipapasa agad ni Uber yung requirements nila.”
kung activated na po at naipasa na po yung mga requirements pwede na po mag start?
“business name”
Dapat po ba may business name before applying sa uber?
Maraming salamat po
Yes, after successful and complete upload of your requirements in your Partner Dashboard, Uber will notify you via email/SMS that your account is activated within 2 days, once your account is activated, you can go online and accept trips in the Uber system. Uber will advise you once your PA is available.
Good Day Admin, can I have the link to the updated/latest requirements for CPC? I received a surprise email few days ago that Uber will suspend my account if I cannot submit it by next week. Actually, I already submitted those documents for my CPC last year (sent it twice last July & October) I tried to keep track of my CPC application with your support via email but it always says that I have to wait and now I got a surprise email. Also, it says that I have incomplete requirements, well in fact, I sent those documents before & my PA was approved & the car was activated & start making trips, until this very moment my unit is still earning trips. Please reply coz I have only a week or so to comply to continue earning with uber. Also, I cannot get any help with your support via email (partnersmanila).Many Thanks.
Hi saan po pwede umattend ng seminar near at novaliches, Please send the schedule. Thanks
Here’s the schedule of the Partner Info Sessions. Sana po makatulong.
http://ubermanilatips.com/uber-manila-info-session-schedule/
my ngbbenta po s akin n toyota vios 1year ng ginagamit s uber until now, ngayon ang tanung k po pgnabili k n ang car n benebenta skin pwd po b itransfer skn s pangalan k ang tnvs n nkapangalan s ngbbenta skn ng car?
You can go to Uber’s Office in The Square, Greenfields, Mandaluyong to have it your account personally processed. Also here’s the schedule of Partner Activation Centers: http://driveonuber.com/s chedules/
Sir mga hangng ilan araw para hindi ma deactivate yon account? Namatayan kasi kami kaya yun driver ko which un papa ko hindi nagng active for 10days na. Magreresume sya next week. Madedeactivate ba account niya? Pls reply! Thanks uber
Hi, open pa po ba registration for UBER partner?My friend wants to buy a car then register it to UBER. Yung concern nya po is baka pag nakabili na sya ng car baka ma-close na ang slot for registration. Is there such as mapuno na slot for registration?
Uber still accepts sign ups. Uber will activate you within 24-48 hours if you submit the required docs. Submit the requirements so when LTFRB resumes the applications, maipapasa agad ni Uber yung requirements ninyo. Refer to this link: http://ubermanilatips.com/ltfrb-halts-acceptance-of-new-tnvs-applications/
can i use mitsubishi mirage hatchback
According to DOTC Department Order, accepted TNVS vehicle types are sedan, AUV an d SUV. There’s NO engine displacement requirement for TNVS vehicles; however, hatchbacks are currently not accepted. You can refer to this article about TNVS vehicle requirements for Uber Philippines. http://ubermanilatips.com/facts-hatchback-vehicles-engine-displacement-requirement-tnvs/
Fellow greetings!
Possible po ba na ma-accept sa uber ang Foton Gratour? Thanks po.
Here’s a full list of the vehicle requirements and accepted cars for Uber Manila, you can also get a car quote in this link:
http://ubermanilatips.com/list-of-accepted-cars-for-uber-manila/
If you need guidance on the requirements for signing up, here’s a step by step guide on how sign up and to be an Uber Partner. http://ubermanilatips.com/how-to-be-an-uber-driverpartner-in-manila/
hi uber,
ask ko lang if ano requirements for uber driver? balak ko sana mag apply as uber driver.
Thanks.
If you need guidance on the requirements for signing up, here’s a step by step guide on how sign up and to be an Uber Partner. http://ubermanilatips.com/how-to-be-an-uber-driverpartner-in-manila/
Is there any fee to pay upon registration or enrollment with Uber? Like how much ang bbayaran kapag nagjoin s Uber?
There’s no fee to register with Uber. Uber only takes 25% service fee from your gross fares when you start driving. However, there is fees for LTFRB TNVS accreditation which costs around Php 5000. But Uber will process this on your behalf and charge you after submission which they deduct from your payout. So there’s no cash out to register and get activated in Uber.
How many years will u be getting 25% from the gross fares? Will it be forever? Is registration with you a binding contract? Or i can quit anytime?
Hi, After 3 years po ba need ulit mag palit ng sasakyan.? for example 2016 model sasakyan ko, 2019 need ko na ba mag palit?
Kindly refer to UberMNLTips’ TNVS FAQ: http://ubermanilatips.com/tnvs-faq-by-ubermnltips/
Is the vehicle required to have a comprehensive insurance or TPL would do ?
Kindly refer to UberMNLTips’ TNVS FAQ http://ubermanilatips.com/tnvs-faq-by-ubermnltips/
good morning. me and my fiance got a car, she is the registered owner and i am the co-maker, but i am the one who’s handling the car.
My Question is, can we register and i will be the one as the operator?
thanks.
Kindly refer to UberMNLTips’ TNVS FAQ: http://ubermanilatips.com/tnvs-faq-by-ubermnltips/
Need help po. Error when opening the download link/s per document/s required for TNVS.
Kindly refer to UberMNLTips’ TNVS FAQ http://ubermanilatips.com/tnvs-faq-by-ubermnltips/
Hi! is Uber expanding in Davao?
Right now, Uber is available in Metro Manila, Cebu and Cavite only.
I heard before that LTFRB hold all applications because some are using uber for illegal operations. How can i apply now?
As of now, you can still register in Uber but you will NOT be activated yet in the system until further notice.
We highly recommend you read on these guides to keep you informed:
1.How to be an Uber Partner: http://ubermanilatips.com/how-to-be-an-uber-driverpartner-in-manila/
2.TNVS Guides: http://ubermanilatips.com/ubermnltips-guide-to-tnvs-and-ltfrb-accreditation/
3.Facts about Hatchback vehicles: http://ubermanilatips.com/facts-hatchback-vehicles-engine-displacement-requirement-tnvs/