How To Be An Uber Driver Or Partner In Manila
ADVISORY
(As of July 2017) Given the inquisition of LTFRB to the TNVS actions and regulations (both Uber & Grab), we highly suggest that if you want to sign up & be a partner, it’s BEST that we WAIT out LTFRB’s decision by September, 2017.
Right now, the LTFRB and TNCs are finalizing the regulations. We trust that the ridesharing industry will be better once there are final regulations and implemeting guidelines.
Let’s all support the LTFRB and TNCs in this endeavor.
But there’s still no stopping you from learning all that you can about the TNVS business and the sign-up process. So, feel free to read and be informed in our blog. 🙂
First, we recommend that you go to one of their Info Sessions to know the details firsthand. We’ve posted about their Info Sessions and it’s schedule here.
Secondly, we want you to refer to Uber’s TNVS Guide to know more about the LTFRB regulation that now governs ridesharing.
Thirdly, we recommend you read this article about what being accredited and regulated means for partners & drivers to know more the business you’re interested to get into.
If you need a list of the accepted cars for Uber Manila, refer here.
If you need assistance, email us your question at the end of this post.
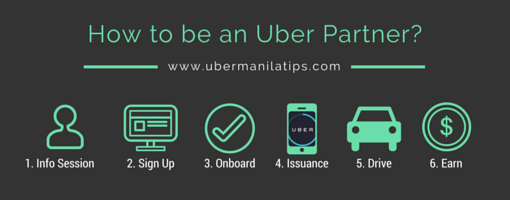
Here’s how you become an Uber Partner:
Step 1: Create Partner Profile
Go to Uber Manila Sign-up Page and choose the city you want to drive in (i.e. “Manila, Metro Manila, Philippines”).
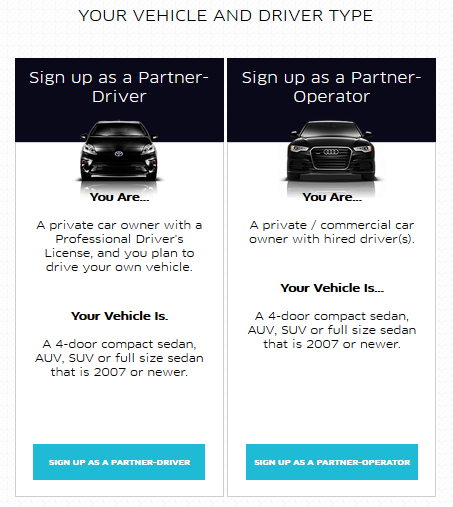
Select your Vehicle Type and Uber Partner Type:
- Vehicle Types: UberX or UberBlack. Check this post describing the difference.
- If you need a list of accepted vehicles for Uber Manila, refer here.
- Partner Account Types: If you will drive your own registered car, select Partner-Driver. If you are a car owner with hired driver/s, select Partner-Operator. Refer to this post to know the difference.
You’ll be taken to this page. Fill in the required fields.
Update, as per LTFRB Regulations, car cannot be older than 3 years old upon registration. If you’ll register in 2015, car must not be older than 2012.
Step 2: Register your Banking Details
In your dashboard, click on the “Banking” menu and you will be taken to another page (https://vault.uber.com)
Important Notes:
- Make sure the name you register is the exact name of the bank account you’re trying to enroll
- the Uber partner (account holder) and the name on the registered bank account does NOT need to be the same
- For Bank SWIFT/BIN Code, refer to this link.
**UPDATE: If you’d like to know the best bank and account type to enroll for Uber Banking, refer to this post.**
Step 3: Enroll a Driver
You’ll need the following details about your driver/s: Driver Name, Cellphone Number, Email Address, Username and Password (you’ll create these) . You can add several drivers including yourself, if you know the limit on the number of vehicles you can enroll, please share with us in the comments.
Requirements:
- Professional Driver’s License + OR
- NBI Clearance
- PNP Clearance (for LTFRB Compliance)
If you have an existing Partner account and want to add a driver, Refer here.
Step 4: Enroll a Vehicle
In the dashboard, you need to add a vehicle and indicate these details about your vehicle: model, make, year, color of interior and exterior. Then, upload the required documents as follows:
- Proof of Vehicle Registration: LTO Registration/ ORCR/ Sales Invoice
- Proof of Insurance: Comprehensive or TPL
- Four (4) Pictures of your vehicle: Front External View (License/CS visible), Rear External View (License/CS visible), Inside View Dashboard Console and Inside View Backseat
Important Notes:
- Make sure the documents are valid and not expired, expiration date is correct and documents are clearly seen
- Model of the vehicle has to be NOT older than 3 years from year of application (as per LTFRB Regulation). If you’ll register in 2015, car cannot be older than 2012.
- You can add multiple vehicles in your Uber Partner account, if you know the limit on the number of vehicles you can enroll, let us know in the comments below.
- The name on the Proof of Registration and Proof of Insurance has to be the SAME
- The name of the Uber Partner (account holder) and the name on the Proof of Registration and Insurance does NOT need to be the same
- Uber will deduct a Passenger Accident Insurance on your first pay out. This is Php 165 per passenger per year. This depends on the passenger capacity of your vehicle. Sample computation 5 seats (4 passenger + 1 driver) x Php 165 = Php 825 per year.
- If you have an account and want to add a vehicle,refer to this post to know how.
IMPORTANT: If you are NOT the car owner of the vehicle you registered with Uber, you MUST read this article about getting TNVS and LTFRB Accreditation if vehicle is not under your name.
Step 5: Driver On-Boarding/ Orientation
Once you’ve completed the requirements, you can go to any of Uber’s office for Driver Orientation and Onboarding. Below are the schedules or you can refer to this ONBOARDING SCHEDULE. After this, Uber will do a background check and results will be released via e-mail after 7 business days.
TAGUIG: *WALK-IN*
- Address: SMX Convention Center, SM Aura, BGC
- Monday – Friday: 10am to 6pm (except non-working holidays)
- Saturday: 10am to 2pm (except non-working holidays)
QUEZON CITY: *WALK-IN*
- Address: Regus, 5th Floor Gateway Tower, Gen. Roxas Avenue cor. Gen. Aguinaldo Avenue, Araneta Center, Cubao, Quezon City, Manila
- Monday – Friday: 11am to 6pm (except non-working holidays)
- Uber we will accept walk-ins for onboarding any time within these specified hours.
Important Notes:
- For faster transaction, UPLOAD all the driver document requirements first before going in for Onboarding.
- If you haven’t uploaded yet, remember to bring a valid Professional Driver’s License or government-issued photo ID.
- Regus’ office policies, shorts and slippers are not allowed.
- Please bring your Professional Drivers License to the onboarding – and also bring a second ID to leave at the reception.
- No need to bring the vehicle for physical inspection.
- You can go for Driver On-Boarding as soon as you’ve uploaded all the requirements above. No need to wait for the document status to be “Active”.
- Only those who will be driving are required to attend (example: if you sign up as a Partner-Operator but do NOT plan to drive – only your DRIVER needs to attend onboarding.
Step 6: Uber Device Issuance
Once you have an active driver and vehicle assigned to your account, you will eligible to claim a device. Devices can be shared by drivers and vehicles; drivers would simply need to login to their individual driver accounts and choose the appropriate vehicle upon login. Please note that the number of devices issued to you is based on the number of active drivers and active vehicles registered to your account, WHICHEVER IS LOWER.
As of May 18, 2015, Uber implemented a new Device Options–Rent to Own and Bring Your Own Device. Refer to this guide to compare the different device options.
You have two choices to schedule your device pick-up or refer to this device options and issuance schedule:
-
ONLINE APPOINTMENT BOOKING SYSTEM
You can now schedule your device pickup online! Receive your device in a matter of minutes as long as you arrive during your designated time slot. No more long waits! Online appointments must be scheduled at least 24 hours in advance.
Click on this link to schedule your pickup: https://ubermanila.acuityscheduling.com/
-
WALK-IN DEVICE PICK-UP
For those who do not wish to set an appointment online, regular device issuance hours are 10am-3pm, Monday – Friday at the SMX Convention Center, SM Aura Tower, 26th Street Corner McKinley Parkway, Bonifacio Global City. Those who arrive after will NOT be issued a device.
You can now also pick-up device in Regus, Cubao at 11am-6pm Tuesday to Fridays in 5th Floor, Regus, Gateway Tower, Araneta Center, Cubao. Please note that there’s NO device issuance on Mondays in Cubao.
Before coming in to claim your device, please make sure that you have ACTIVE vehicles registered to your account. If you have recently added a vehicle and it is still in ‘PENDING’ status, please send an e-mail at partnersmanila@uber.com so Uber can review approve the vehicle. Vehicles must have complete documents before they can be activated.
Only active partners or active drivers can claim a device. Representatives are not allowed.
Step 7: Get LTFRB Accreditation
Once you are successful in your registration as a Parnter with Uber, you’ll need to get LTFRB Accreditation.
DON’T WORRY, IT’S EASY!
Uber is facilitating this via the Uber Compliance Program. Existing Partner-Operators, Partner-Drivers, and Drivers under a Partner need to submit requirements to Uber to start the accreditation.
**Click here for the guide to the Uber Compliance Program**
IMPORTANT: If you are NOT the car owner of the vehicle you registered with Uber, you MUST read this article about getting TNVS and LTFRB Accreditation if vehicle is not under your name.
Also, you might want to read our article “LTFRB Accreditation: What it really means for Uber Partners & GrabPeers” so you know the business you want to participate in.
Please let us know if there are details that need to be updated in this post, everyone will greatly appreciate your contribution!
If you still have questions, you can contact us or comment on this post. We’ll try our best to give you the most accurate information.

